
(UPDATE 1/19/2013) – NEW blog post on Beagleboard XM installing Ubuntu 12.10, includes enabling SPI and more click this link BLOG POST
(UPDATED 7/5/2012) – (added ubuntu-11.10-r3 download from dropbox, as original source no longer exists.)
So this is for people that are trying to get SPI working on their Beagleboard XM rev C boards. At the time that I began this adventure I had no clue how to get SPI working on my board. So I decided to blog about it while I was learning, and now it works. The setup is for Ubuntu 11.10 and using Kernel v3.1.10 So let me share with you.
Now you must understand I’ve spend much time looking at many different posts on the google group “beagleboard”, many blog sites, elinux pages and such. People are just ripping their hair out as someone put it on how to successfully get SPI working. What I found was skattered knowledge of the topic and I wanted to bring it all together for the novice user.
There is something else you should know about me and that is i’m a novice user in the Linux world. In my search I was really searching for was a straight forward walk though from starting to finish, starting with a blank 4GB microSD card and ending on getting SPI working.
So lets get started from the beginning….
USED Accessories:
- Beagleboard XM rev C
- SanDisk 8GB microSD
- SD to USB reader
- Windows computer using virtual box, running Ubuntu 11.04 (Natty)
Step One:
Identify your SD Card in Ubuntu
df -h
You’ll see something like the following, notice how my 4GB flash drive is referenced as /dev/sdb1 this is important and “sdb” will be used later in many different cases:
Filesystem Size Used Avail Use% Mounted on
/dev/sda1 6.1G 3.8G 2.1G 65% /
none 943M 652K 942M 1% /dev
none 949M 1.1M 948M 1% /dev/shm
none 949M 100K 949M 1% /var/run
none 949M 0 949M 0% /var/lock
/dev/sdb1 3.7G 32K 3.7G 1% /media/5DA5-2520
wget http://rcn-ee.net/deb/rootfs/oneiric/ubuntu-11.10-r3-minimal-armel.tar.xz
(UPDATE – THE ABOVE DOWNLOAD NO LONGER WORKS, PLEASE SEE FOLLOWING LINK FOR FILE) Be sure to place this in the standard home directory like before. Then continue procedure.
wget https://dl.dropbox.com/s/c5jc16rdqnjglw3/ubuntu-11.10-r3-minimal-armel.tar.xz?dl=1
Once that has downloaded you want to verify that the download was successful, we do this with whats called a checksum. This is an advance algorithm that spits out a number that can be compared to verify the download was sucessful. To do so type the following by typing:
md5sum ubuntu-11.10-r3-minimal-armel.tar.xz
You must get a result that matches this!
551e66185c5ce3c6270a8e38b8ac6457 ubuntu-11.10-r3-minimal-armel.tar.xz
Since this is a TAR file, similar to a ZIP in windows so we must extract the files and than go to that directory
tar xJf ubuntu-11.10-r3-minimal-armel.tar.xz
cd ubuntu-11.10-r3-minimal-armel
Now that you’re in the right directory its time to call the script that RCN-EE (Robert Nelson) made what will partition and setup all the files on the micro SD card. Now this part its important to remember the drive name that we did above, “sdb” as this is substituted into the command below.
sudo ./setup_sdcard.sh –mmc /dev/sdb –uboot beagle_xm
Mine is taking about 10 mins to setup, this may vary.
After this is complete go into the disk utility found at System -> Administration ->Disk Utility, and make sure you unmount and Safely Remove the drive (MAKE SURE YOU DO THIS EVERY TIME).
Step Two:
uname -r
At the time of this writing mine is version 3.1.6-x6 (This changes to 3.1.10-x7 by the end of the procedure), now to check the version of Ubuntu type
lsb_release -a
SPI BACKGROUND
Now a little bit of SPI background knowledge is needed in order to get this working. First off Serial Peripheral interface (SPI) is made up of 4 wires normally. It is a standard that was designed by Motorola for use with their micro controllers. If you’re interested in learning more about SPI i’ve added the Wikipedia link in the bibliography below. Here is what a standard SPI setup looks like, multiple slaves is optional.
SS – Slave Select (Beagleboard community calles this Chip Select (CS))
MOSI – Master Out Slave In
MISO – Master In Slave Out
CLK – Clock

On the Beagleboard XM there are 4 SPI controllers that come with the processor, but only two of them have been brought out to be used in the hardware, these are McSPI3( I will be using) and McSPI4. I’ve written up a small table in excel to demonstrate this information (details came originally from BB XM manual).
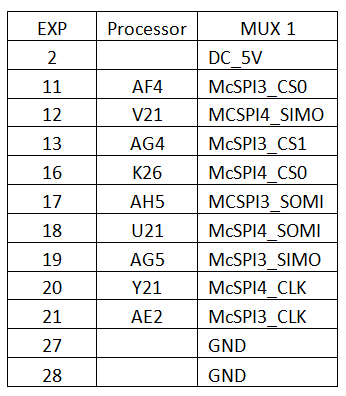
It will be important later when we’re testing the test program that we have the right pins connected. We’ll connect pins 17 and 19 of the output pins MOSI into the MISO
Step Three:
So now we’ve made it to the point of needing to setup the SPI pins in the Kernel. Everything i’ve learned is from a combination of time, searching all over the internet and a couple discussions with Robert Nelson and reading through lots of his scripts.
Now from my reading there are two main parts that have to be changed. The first is the PIN MULTIPLEXER, the second is configuring the SPI_BOARD_INFO. Most of this is skipped and done automatically through scripts we’ll be using but its good to know whats going on. More information can be found at http://elinux.org/BeagleBoard/SPI if you’re interested.
First there are a bunch of tools you need in your Ubuntu environment. These include the ARM compiler and the Git tool, uboot tools and more, you’ll understand as we progress. So lets install these ( virtualbox Ubuntu):
sudo apt-get install gcc-arm-linux-gnueabi git
sudo apt-get install ccache libncurses5-dev u-boot-tools
Next we need to download the latest version of Ubuntu with the SPI patch
git clone git://github.com/RobertCNelson/stable-kernel.git
cd stable-kernel
git checkout origin/v3.1.x -b v3.1.x
gedit build_kernel.sh
Un-comment,
#patch -p1 < ${DIR}/patches/beagle/0001-spi-testing.patch
NOTE: you might have to copy the system.sh.sample file to system.sh like I had too.
cp system.sh.sample system.sh
Now you have to un-comment a line in system.sh by removing the “#” symbol. Save it and continue.We will come back to edit this file more later, so keep note where it is and read through it if you have time. As this file holds the MMC directory for when we’re using the load uImage script.
gedit system.sh
#CC=arm-linux-gnueabi-
In order to compile the kernel you have to first have all the basic Linux kernel files. To do this we must have the following files. By typing in the following, it should take a while (~500MB):
cd ~/
git clone git://git.kernel.org/pub/scm/linux/kernel/git/stable/linux-stable.git
After this is complete we are ready to compile the kernel, make sure you go back to the stable-kernel directory before you build the kernel.
cd~/
cd stable-kernel
./build_kernel.sh
During this time it will change from a default terminal screen to a select screen that looks like the following.
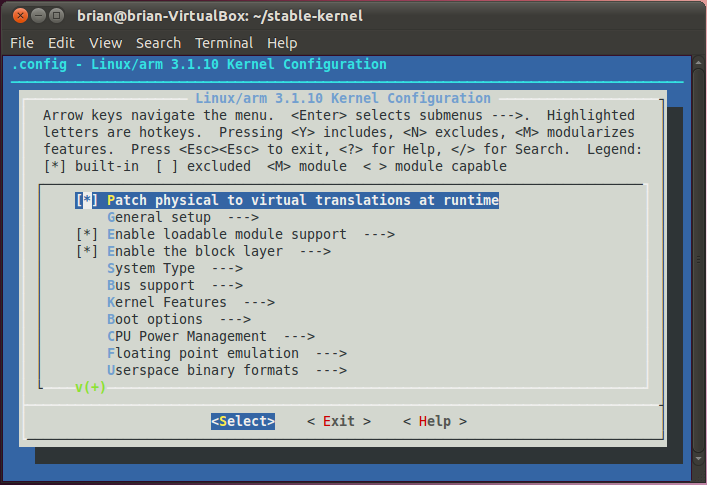
Once your to the Kernel Configuration menu scroll down to the “Device Drivers” then go to “SPI Support” and than make sure the following are selected.
[*] Debug support for SPI devices
[*] McSPI driver for OMAP
[*] User mode SPI device driver support
Two things have to be done before this can be done. First you have to edit the system.sh file again. Make the following adjustments according to your drive letter like the beginning of this article (/dev/sdb)
cd ~/
cd stable-kernel/
gedit system.sh
CHANGE the MMC and un-comment “#” in front of the ZRELADDR:
MMC=/dev/sdb
and
ZRELADDR=0x80008000
If you desire to go into board-omap3beagle.c located in KERNEL you can change some of the default settings and then apply this patch.
Note: you’ll need to recompile the kernel afterwords I believe. I didn’t have to update, this was advice from Robert.
git diff > ../patches/beagle/0001-spi-testing.patch
Now the last step is to load all the files to the microSD card, make sure you’re in the /stable-kernel/ directory still:
. ./tools/load_uImage.sh
After all the loading is done safely remove the flash card from your computer and load it into the Beagleboard Xm. Once everything is loaded up you should be able to change directories to the /dev/ and see your spidev3.0 and spidev3.1 device names there now.
Step 4
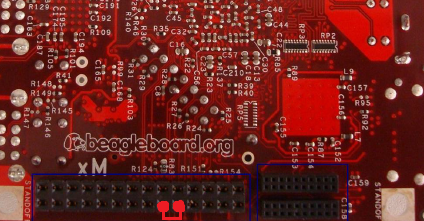
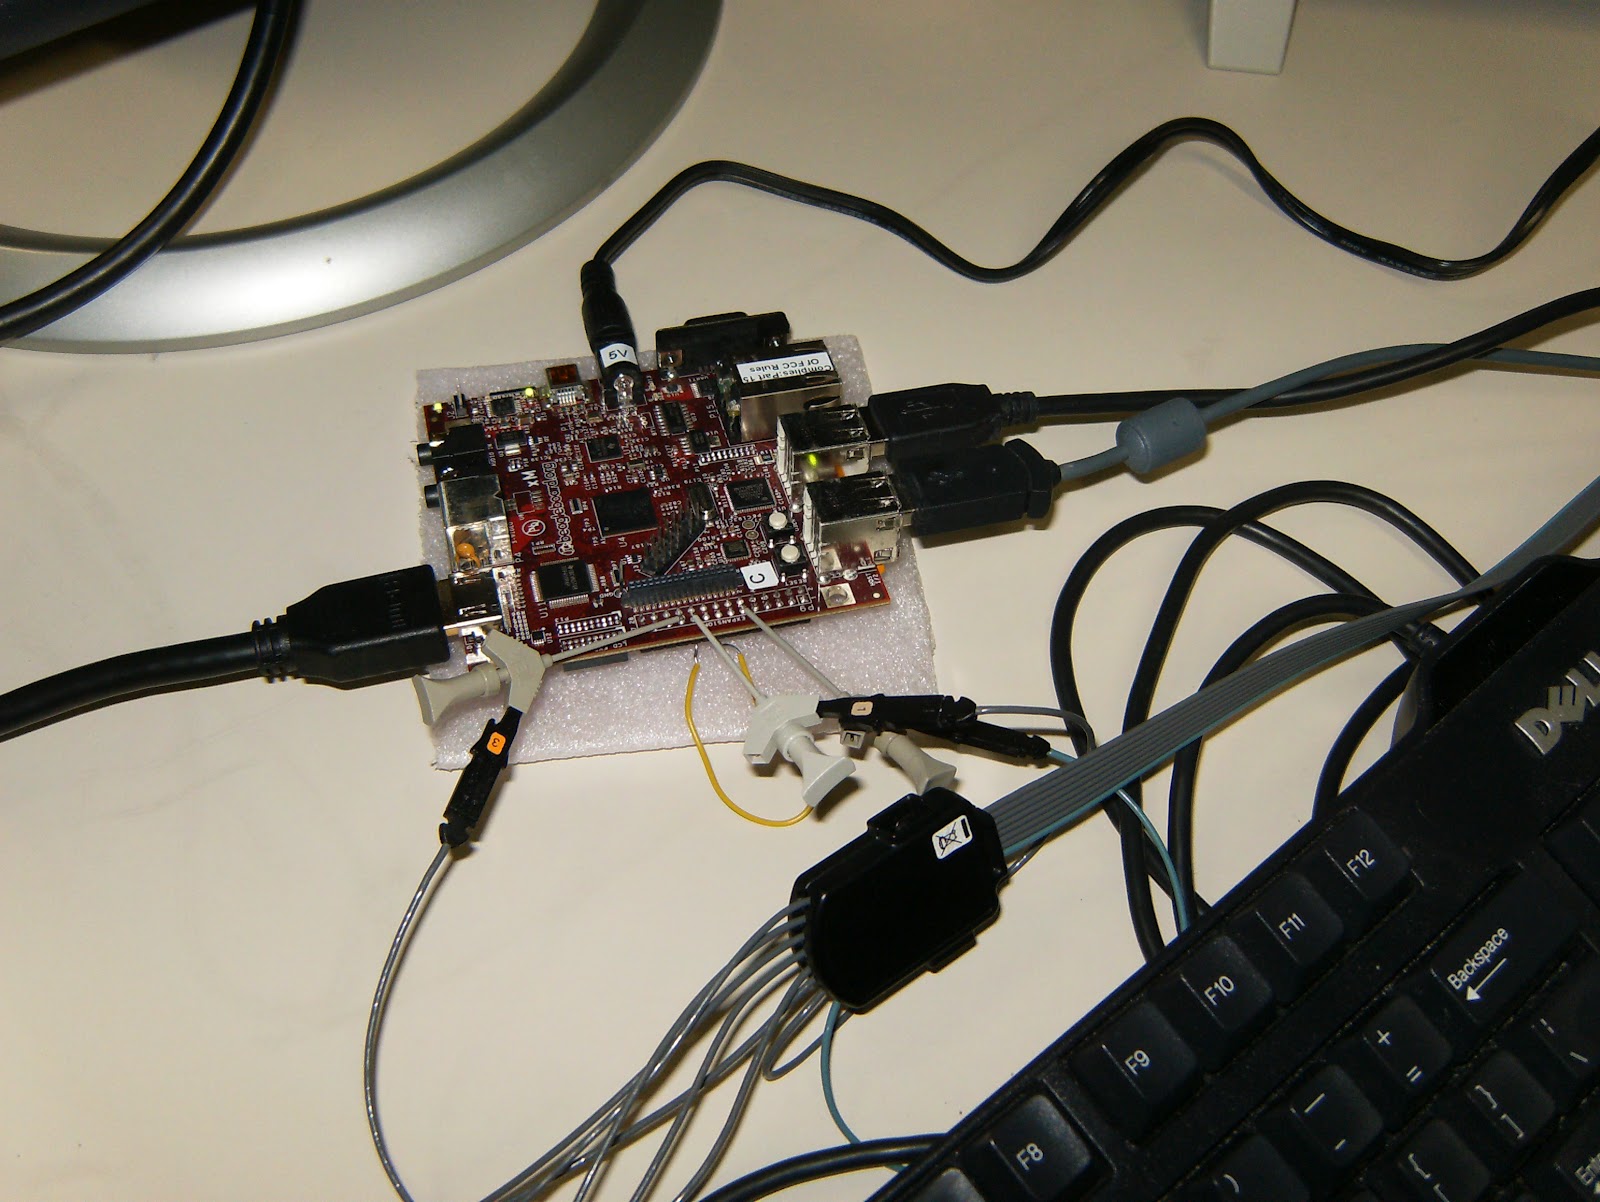
Time to test this code and and see that everything works. To do this i’m going to load my microSD card back into virtualbox and test the ports. To do this we need to reference the table for the pins above and connect pins 17 and 19 which are SPI3.0 MOSI and MISO. They look like the following on the back of the board (MARKED IN RED DOTS).
cd linux-stable/
arm-linux-gnueabi-gcc Documentation/spi/spidev_test.c -o spitest
Once this is created, move the “spitest” to the main directory of your microSD card where Ubuntu is running, normally found in the /home/ubuntu area.
./spitest -D /dev/spidev3.0
0xFF, 0xFF, 0xFF, 0xFF, 0xFF, 0xFF,0x40, 0x00, 0x00, 0x00, 0x00, 0x95,0xFF, 0xFF, 0xFF, 0xFF, 0xFF, 0xFF,0xFF, 0xFF, 0xFF, 0xFF, 0xFF, 0xFF,0xFF, 0xFF, 0xFF, 0xFF, 0xFF, 0xFF,0xDE, 0xAD, 0xBE, 0xEF, 0xBA, 0xAD,0xF0, 0x0D,
If you didn’t hook up the right pins on the beagleboard xm you’ll see something like this
0xFF, 0xFF, 0xFF, 0xFF, 0xFF, 0xFF,
0xFF, 0xFF, 0xFF, 0xFF, 0xFF, 0xFF,
0xFF, 0xFF, 0xFF, 0xFF, 0xFF, 0xFF,0xFF, 0xFF, 0xFF, 0xFF, 0xFF, 0xFF,0xFF, 0xFF, 0xFF, 0xFF, 0xFF, 0xFF,0xFF, 0xFF, 0xFF, 0xFF, 0xFF, 0xFF,0xFF, 0xFF,
If you saw the first set of data above then you’ve completely setup SPI correctly. Congrats!!
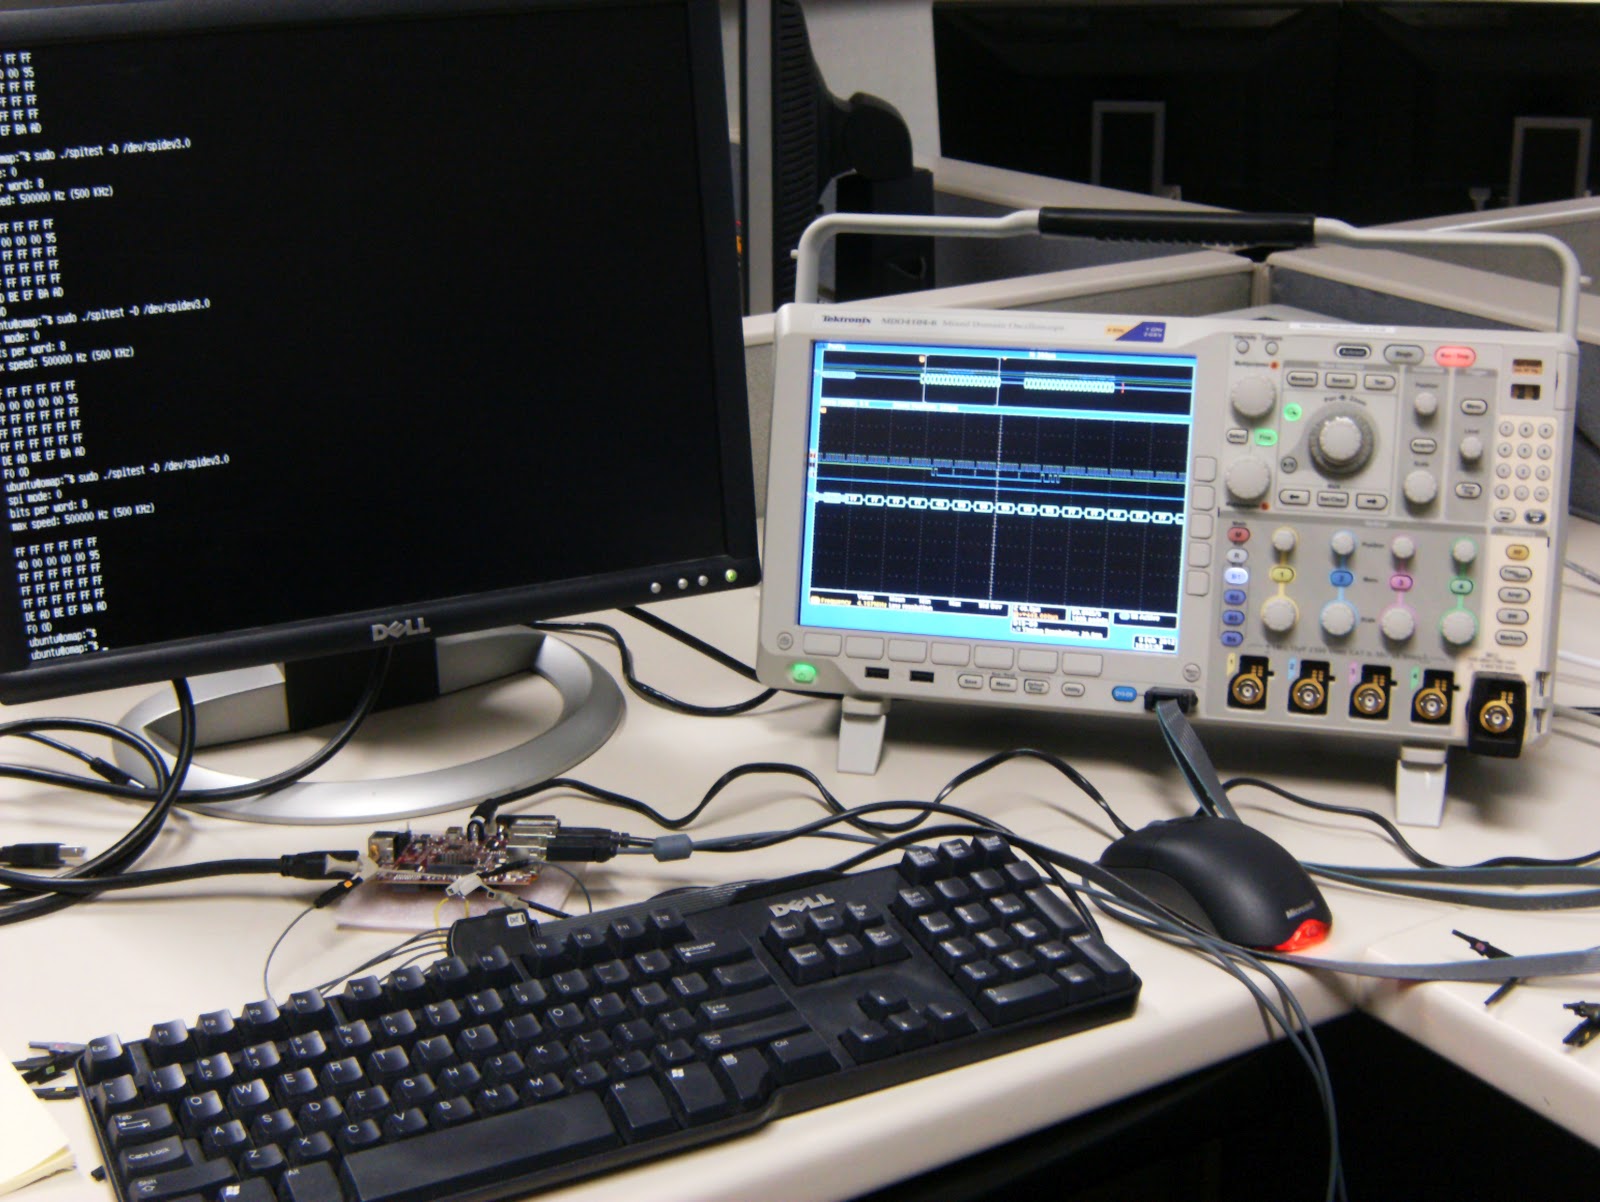
(Here is my whole setup probing the Beagleboard Xm with a Tektronix MDO4104-6)

(screen capture from MDO4104-6 Mixed domain Oscilloscope showing decoded SPI signal)
As you can see I’m decoding the channels from the BBXm and i’m getting the correct SPITEST signal. This has been the final verification that i’m seeing both the Clock, MOSI and SS pins working. Sweet!!
If you liked my demonstration please leave feedback and pass this along.
Bibliography
Here are a few useful links I used during this process…
Helpful information on GIT commands and how things work:
http://stackoverflow.com/questions/67699/how-do-i-clone-all-remote-branches-with-git
Good reference blog for Angtrom SPI setup:
http://linuxdeveloper.blogspot.com/2011/10/enabling-spi-on-beagleboard-xm.html
Wikipedia SPI details (I added if you wanted to learn more):
http://en.wikipedia.org/wiki/Serial_Peripheral_Interface_Bus
Elinux:
http://elinux.org/BeagleBoardUbuntu
http://elinux.org/BeagleBoard/SPI
http://elinux.org/BeagleBoard/SPI#Little_Word_about_recompiling_the_Kernel
Beagleboard Manual:
http://beagleboard.org/static/BBxMSRM_latest.pdf
General Linux, full detail SPI kernel compile:
http://www.jumpnowtek.com/index.php?option=com_content&view=article&id=57&Itemid=62
Thank you for this excellent article. I am a linux beginner and had no problems at all. Worked first time! Will hook up my SPI sensors to my beagleboard now.
Thanks a lot. After a lot of messing with the Angstrom distribution and different tips scatter on websites, following this tutorial was much easier and the test seems to work. Thanks!
Hi Brian,
many thanks – thanks to your instruction Ubuntu is running stable on my BB finally.
Could you maybe add hints what you have to do for getting access to gpios, somehow I don't get the instruction
http://elinux.org/BeagleBoardPinMux
Do I have to change sth. at the Kernel configuration as well?
Cheers Johannes
Thank You Dude!
Hi Brian,
I'm trying to enable SPI on BB XM.
After kernel recompilation I have:
root@beagleboard:/# ls -lh /dev | grep spi
crw-rw—- 1 root root 153, 0 Jan 1 1970 spidev3.0
crw-rw—- 1 root root 153, 1 Jan 1 1970 spidev3.1
crw-rw—- 1 root root 153, 2 Jan 1 1970 spidev4.0
On dmesg I can see:
####
root@beagleboard:~# dmesg | grep spi
[ 2040.715728] omap2_mcspi omap2_mcspi.1: registered master spi1
[ 2040.715881] omap2_mcspi omap2_mcspi.2: registered master spi2
[ 2040.716033] omap2_mcspi omap2_mcspi.3: registered master spi3
[ 2040.716094] spi spi3.0: setup: speed 48000000, sample trailing edge, clk normal
[ 2040.716094] spi spi3.0: setup mode 1, 8 bits/w, 48000000 Hz max –> 0
[ 2040.716186] omap2_mcspi omap2_mcspi.3: registered child spi3.0
[ 2040.716217] spi spi3.1: setup: speed 48000000, sample trailing edge, clk normal
[ 2040.716247] spi spi3.1: setup mode 1, 8 bits/w, 48000000 Hz max –> 0
[ 2040.716339] omap2_mcspi omap2_mcspi.3: registered child spi3.1
[ 2040.716461] omap2_mcspi omap2_mcspi.4: registered master spi4
[ 2040.716491] spi spi4.0: setup: speed 48000000, sample trailing edge, clk normal
[ 2040.716522] spi spi4.0: setup mode 1, 8 bits/w, 48000000 Hz max –> 0
[ 2040.716613] omap2_mcspi omap2_mcspi.4: registered child spi4.0
####
So I think SPI is correctly enabled.
Then I tried to run the spitest, but it's not working:
###
root@beagleboard:/# ./spitest -D /dev/spidev3.0
spi mode: 0
bits per word: 8
max speed: 5[ 1808.783966] spidev spi3.0: DMA RX last word empty00000 Hz (500 KHz)
00 00 00 00 00 00
00 00 00 00 00 00
00 00 00 00 00 00
00 00 00 00 00 00
00 00 00 00 00 00
00 00 00 00 00 00
00 0D
root@beagleboard:/#
###
It's the same for all three spidev…even if the expansion pins are connected.
Always on dmesg, after trying with ./spitest -D /dev/spidev3.0, I have:
####
[ 2242.536773] spidev spi3.0: setup: speed 48000000, sample leading edge, clk normal
[ 2242.536804] spidev spi3.0: setup mode 0, 8 bits/w, 48000000 Hz max –> 0
[ 2242.536804] spidev spi3.0: spi mode 00
[ 2242.536834] spidev spi3.0: setup: speed 48000000, sample leading edge, clk normal
[ 2242.536834] spidev spi3.0: setup mode 0, 8 bits/w, 48000000 Hz max –> 0
[ 2242.536865] spidev spi3.0: 8 bits per word
[ 2242.536865] spidev spi3.0: setup: speed 375000, sample leading edge, clk normal
[ 2242.536895] spidev spi3.0: setup mode 0, 8 bits/w, 500000 Hz max –> 0
[ 2242.536895] spidev spi3.0: 500000 Hz (max)
[ 2242.537261] spidev spi3.0: setup: speed 375000, sample leading edge, clk normal
[ 2242.538146] spidev spi3.0: DMA RX last word empty
[ 2242.546234] spidev spi3.0: setup: speed 375000, sample leading edge, clk normal
####
Do you have some hints?
Thank you in advance!
Hi Daniele!
I have the same problem as you. I think I have the driver setup correctly because when I type:
root@beagleboard:/# ls -lh /dev | grep spi
crw-rw—- 1 root root 153, 0 Jan 1 1970 spidev3.0
crw-rw—- 1 root root 153, 1 Jan 1 1970 spidev3.1
crw-rw—- 1 root root 153, 2 Jan 1 1970 spidev4.0
root@beagleboard:~# dmesg | grep spi
root@beagleboard:~# dmesg | grep spi
[ 5311.925872] omap2_mcspi omap2_mcspi.1: registered master spi1
[ 5311.926025] omap2_mcspi omap2_mcspi.2: registered master spi2
[ 5311.926177] omap2_mcspi omap2_mcspi.3: registered master spi3
[ 5311.926208] spi spi3.0: setup: speed 48000000, sample trailing edge, clk normal
[ 5311.926239] spi spi3.0: setup mode 1, 8 bits/w, 48000000 Hz max –> 0
[ 5311.926330] omap2_mcspi omap2_mcspi.3: registered child spi3.0
[ 5311.926361] spi spi3.1: setup: speed 48000000, sample trailing edge, clk normal
[ 5311.926391] spi spi3.1: setup mode 1, 8 bits/w, 48000000 Hz max –> 0
[ 5311.926452] omap2_mcspi omap2_mcspi.3: registered child spi3.1
[ 5311.926605] omap2_mcspi omap2_mcspi.4: registered master spi4
[ 5311.926635] spi spi4.0: setup: speed 48000000, sample trailing edge, clk normal
[ 5311.926666] spi spi4.0: setup mode 1, 8 bits/w, 48000000 Hz max –> 0
[ 5311.926727] omap2_mcspi omap2_mcspi.4: registered child spi4.0
But the spitest is not working…
root@beagleboard:~#./spitest -D /dev/spidev4.0
spi mode: 0
bits per word: 8
max speed: 5[ 5415.171386] spidev spi4.0: DMA RX last word empty00000 Hz (500 KHz)
00 00 00 00 00 00
00 00 00 00 00 00
00 00 00 00 00 00
00 00 00 00 00 00
00 00 00 00 00 00
00 00 00 00 00 00
00 0D
and if I try again the dmesg command I have new configurations setup
root@beagleboard:~/workspace# dmesg | grep spi
[ 5311.925872] omap2_mcspi omap2_mcspi.1: registered master spi1
[ 5311.926025] omap2_mcspi omap2_mcspi.2: registered master spi2
[ 5311.926177] omap2_mcspi omap2_mcspi.3: registered master spi3
[ 5311.926208] spi spi3.0: setup: speed 48000000, sample trailing edge, clk normal
[ 5311.926239] spi spi3.0: setup mode 1, 8 bits/w, 48000000 Hz max –> 0
[ 5311.926330] omap2_mcspi omap2_mcspi.3: registered child spi3.0
[ 5311.926361] spi spi3.1: setup: speed 48000000, sample trailing edge, clk normal
[ 5311.926391] spi spi3.1: setup mode 1, 8 bits/w, 48000000 Hz max –> 0
[ 5311.926452] omap2_mcspi omap2_mcspi.3: registered child spi3.1
[ 5311.926605] omap2_mcspi omap2_mcspi.4: registered master spi4
[ 5311.926635] spi spi4.0: setup: speed 48000000, sample trailing edge, clk normal
[ 5311.926666] spi spi4.0: setup mode 1, 8 bits/w, 48000000 Hz max –> 0
[ 5311.926727] omap2_mcspi omap2_mcspi.4: registered child spi4.0
[ 5415.170013] spidev spi4.0: setup: speed 48000000, sample leading edge, clk normal
[ 5415.170043] spidev spi4.0: setup mode 0, 8 bits/w, 48000000 Hz max –> 0
[ 5415.170043] spidev spi4.0: spi mode 00
[ 5415.170074] spidev spi4.0: setup: speed 48000000, sample leading edge, clk normal
[ 5415.170074] spidev spi4.0: setup mode 0, 8 bits/w, 48000000 Hz max –> 0
[ 5415.170104] spidev spi4.0: 8 bits per word
[ 5415.170104] spidev spi4.0: setup: speed 375000, sample leading edge, clk normal
[ 5415.170104] spidev spi4.0: setup mode 0, 8 bits/w, 500000 Hz max –> 0
[ 5415.170135] spidev spi4.0: 500000 Hz (max)
[ 5415.170501] spidev spi4.0: setup: speed 375000, sample leading edge, clk normal
[ 5415.171386] spidev spi4.0: DMA RX last word empty
[ 5415.179473] spidev spi4.0: setup: speed 375000, sample leading edge, clk normal
When I put the oscilloscope in the SIMO pin and I execute the spitest I cannot see any signal, so I am not transmitting anything.
Any idea?
David Calero
Check out the new message posted, I have the same problem as you in relation with the spi, did you solve it?
David Calero
Hi David,
sorry for the late reply, I didn't check this blog for a while.
Btw, I'm still not able to have spi working correctly…did you do any progress?
One thing I noticed is the mismatch between sample leading/trailing edge during the test.
If you look at dmesg during the boot, you can see that every spi-related message references to "sample trailing edge" mode, while the dmesg spi messages after the try with spitest talk about "sample leading edge". I don't know of this relevant, what do you think about this?
Thank you,
Daniele
This comment has been removed by the author.
Hi David and others,
I'm working on an updated post, I see some of the links and such are not working anymore. Hopefully will have it updated soon.
Cheers,
Brian Hensley
Hi All,
So I ended up adding the original download that Robert removed from his website to a dropbox location. The link is above and the rest of the procedure should work now.
Cheers,
Brian Hensley
Hi Daniele, Brian
I finally setup the spidev correctly. Look at the following post where I explain how easy is to setup spidev in an Arch-linux distribution, No need of compiling kernels or u-boot, only passing a paramter.
http://linuxdeveloper.blogspot.com.es/2011/10/enabling-spi-on-beagleboard-xm.html
Cheers
David
Hi Thank for your post,
I would like to ask, why the transmision in packets of 8 Bits?
Is it possible to read and send data in longer strings? like 64?
Is ist necesary this Pause after each 8 bits?
hi Braian
sorry, can I know which was your last changing to resolve "DMA RX last word empty00000 ", what did you change on kernel config, please?
Giovanni
Hi, Braian,
Great work. Thanks for sharing. I just started my project making use of the SPI interface to build an digital-to-analog board. Very appreciated your blog.
Dan
http://users.ox.ac.uk/~engs1058/
I wrote this back in Feb of this year. I'm not sure it is fully still working or all the links. My hope is that it helps people at least get started with their projects. I ran into many issues in the beginning and wanted to document it as best as possible. I'm very glad it's helping you. Thanks for your feedback!
Cheers,
Brian
Hi,
I think than have some problem with the RobertCNelson linux distribution, in ./build_kernel.sh shows some problems, any one can halp?
Hello,
I found 2 problems in the tutorial above.
First: in build_kernel.sh
there is no #patch -p1 < ${DIR}/patches/beagle/0001-spi-testing.patch line te uncomment.
Second: When i run ./build_kernel.sh i get following error:
1 file changed, 3 deletions(-)
[git] omap-cpufreq
fatal: Couldn't find remote ref omap_cpufreq_v3.1-rc8
Has someone any clue how to solve this problem?
Regards,
Bart
I have exactly the same problem as described by Bart Poupaert:
First: in build_kernel.sh
there is no #patch -p1 < ${DIR}/patches/beagle/0001-spi-testing.patch line te uncomment.
Second: When i run ./build_kernel.sh i get following error:
1 file changed, 3 deletions(-)
[git] omap-cpufreq
fatal: Couldn't find remote ref omap_cpufreq_v3.1-rc8
Any hints?
I had contact with Mr Nelson R.
I did what he wrote me and now i see the SPIDEV files in the /dev library. I wasn't able to test it but for now it looks good.
If you have any more questions i'll try to answer the as best as possible.
This is what he wrote me:
Hi Bart,
Basically the functionality you seek is already enabled by default in
the shipping "demo" images i have posted on elinux.. Just make sure
you edit the "uEnv.txt" boot script: change buddy=${buddy} to
buddy=spidev… From the "stable-kernel" repo standpoint, use either
the v3.2.x or v3.6.x branches..
Regards,
Thanks Bart,
in the meantime I also got it working using Ubuntu 12.10 where you also only need to enable the spi devices via uEnv.txt:
buddy=spidev
… that's all.
This should be mentioned at the beginning of this blog article. There is a lot of old documentation out there and people like you and me wasted a lot of time needlessly…
Regards,
Jens
Hi Jens,
I did write this post quite some time ago and i'm sure things have changed. I'll look into testing 12.10 and editing the uEnv.txt file and i'll update the beginning of this post to save others time. Thanks for the feedback and for helping each other out.
Cheers,
Brian
Hi Brian,
this would be great since your page has the best info about Beagleboard/Raspberry out there 🙂 Keep it up!
Cheers,
Jens
This comment has been removed by the author.
Hi Brian,
So you didn't build a new kernel uImage?
Did you do some testing?
Regards,
Bart
Hi Brian,
i tried to load all files to the microCD card (step 3) but Ubuntu can't find the file load_uImage.sh. I'm using the Ubuntu 12.04-r9-minimal-armhf.
Where can i find this file?
Regards,
George
Hi Bart,
Sorry for the delay. I wrote a new blog post that includes some of the simple details on installing 12.10 and enabling SPI.
http://www.brianhensley.net/2013/01/beagleboard-xm-how-to-install-ubuntu.html
Cheers,
Brian
Hi Brian. Thank you for sharing your work. I've got a problem. Now there are not 0001-spi-testing-patch. There are (under patches/beagle):
0001-expansion-add-buddy-param-for-expansionboard-names.patch
0002-expansion-add-mmc-regulator-and-ds1307-rtc.patch
0003-expansion-add-zippy.patch
0004-expansion-add-zippy2.patch
0005-expansion-add-trainer.patch
0006-expansion-add-ulcd.patch
0007-expansion-add-wifi.patch
0008-beagleboard-reinstate-usage-of-hi-speed-PLL-divider.patch
0009-Turn-on-the-USB-regulator-on-Beagle-xM-explicitly.patch
0010-beagleboard-fix-uLCD7-support.patch
0010-meego-modedb-add-Toshiba-LTA070B220F-800×480-support.patch
0011-default-to-fifo-mode-5-for-old-musb-beagles.patch
0012-ASoC-omap-add-MODULE_ALIAS-to-mcbsp-and-pcm-drivers.patch
0012-backlight-Add-TLC59108-backlight-control-driver.patch
0013-ASoC-omap-convert-per-board-modules-to-platform-driv.patch
0013-tlc59108-adjust-for-beagleboard-uLCD7.patch
Do you know how to solve this?. Robert's stable-kernel files have changed from the version you used in this usefull post.
Thank you.
Regards.
hello, I have same problem but I don't have any clue how to solve it. If you solve this problem, can you share the solution? Thanks…
Hi – I am trying to interface beagle board with another slave SPI chip.
Using the SPI 3_0 channel. I can see MOSI activity and CLOCK. However, MISO is always returning 0 when in SPI MODE 0. If I use MODE 1 MISO has some weird bit shifting (wrapping) of what was sent out on MOSI.
Any ideas? Appreciate your help.
Regards
Sunny