 My wife and I live in the beautiful North West, near Portland Oregon. When we bought our first house last year we discovered during the rainy season that we had soft spots along the bottom 5 inches of our siding. We had two solutions, replace all the siding on the south side of our house or install a belly band / trim board. This tutorial will cover the basics of how to cut, replace and fix this issue. Hope this helps you in your DIY projects and best of luck!
I found a video from This Old House that gives some great starting tips!
Two things, from the video i’m not using lap siding, and my house’s sheathing layer is just the T1-11, I don’t have OSB and a moisture / vapor barrier. This presents some unique challenges.
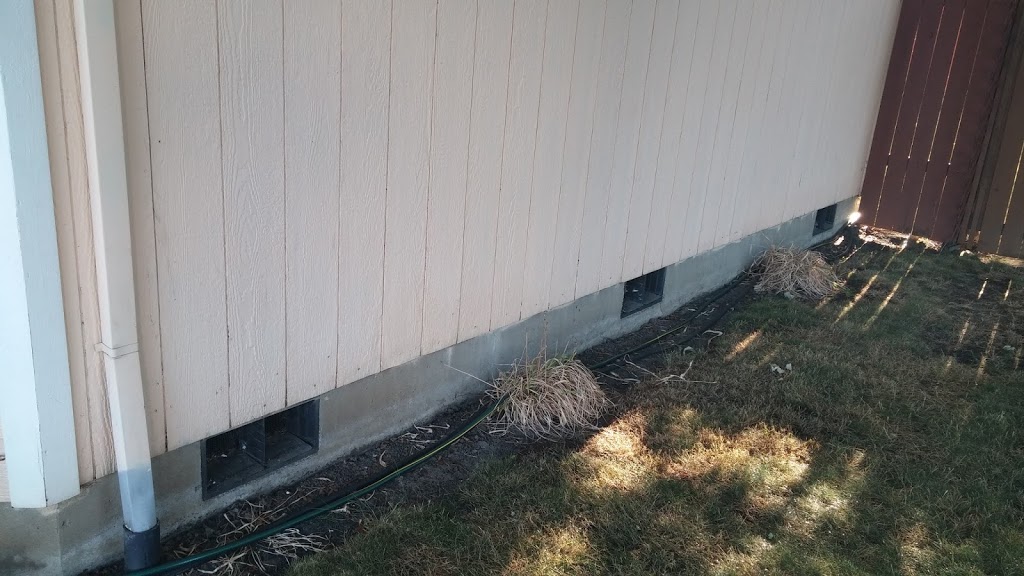
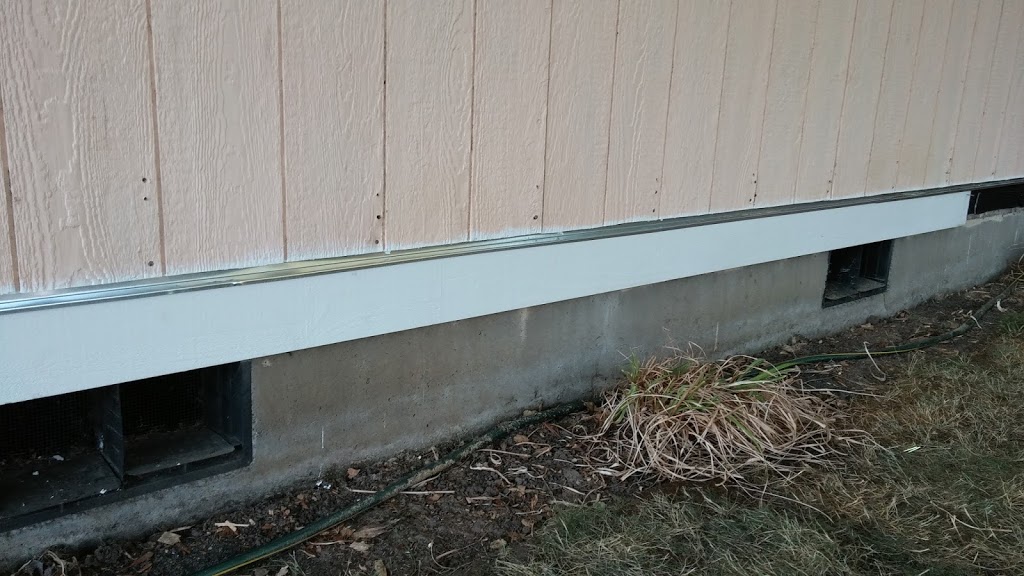
Below is a picture of the side of my house needing repair, it might be hard to tell but when wet I could push my finger through the bottom few inches easily. While its dry it crumbles really easy when I pull up on it. I recommend doing the tap test to figure out how much needs to be replaced, I start from the top about 10 inches high and working my way down I tap gently to feel the density, its easy to tell where the soft parts start. Mines about 5-6 inches above the concrete foundation.
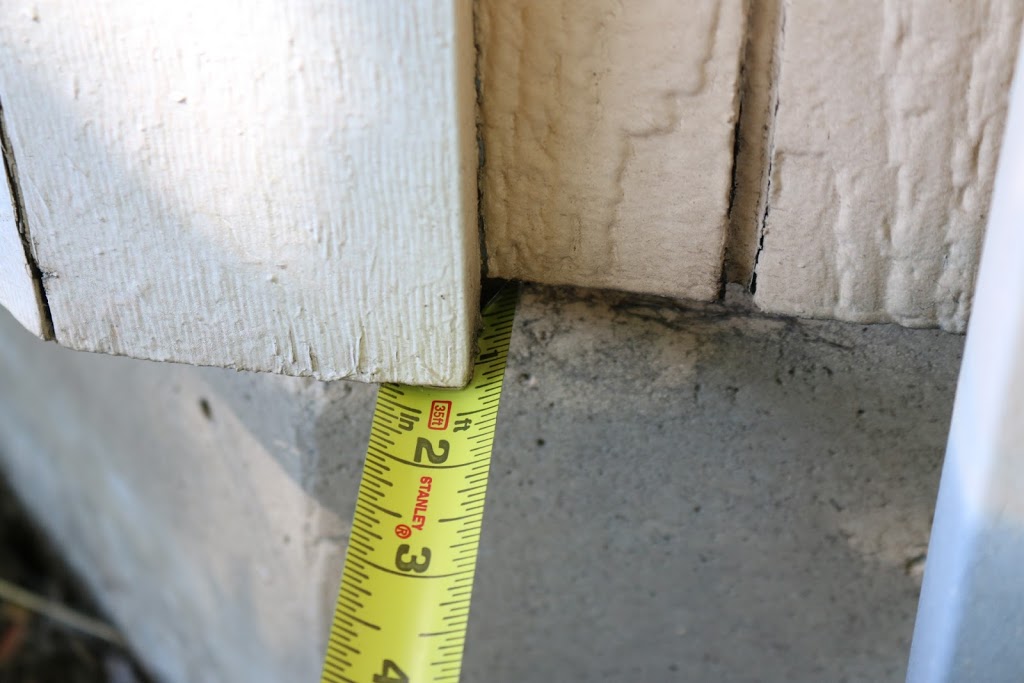
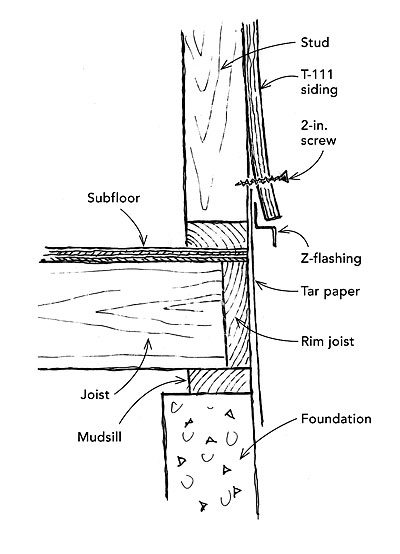
The first thing I did was figure out my length and depth that needed replacement. The trim pieces go over your siding so you’ll need to figure out what you want to do around the trim. I ended up doing the length up to the trim, and cut and replaced the 1/2 piece behind the trim.
My length was about 21 feet, the depth I chose was the depth of the trim 3/4″ plus the depth of my T1-11 siding 1/2″ for a total of 1-1/4″. Therefor my new trim piece along the base will be equal depth to the existing trim.
Next remove all the vertical trim along the side you’re replacing, So not to cut off the trim with the circular saw. Then take a chalk line and have one person (my wife hold it exactly 6 inches above the concrete. Move over about 10 feet and marked 6″ up as well and drew my line with a chalk snap. Double check its flat with a level, its better to measure twice and cut once as my dad always said.
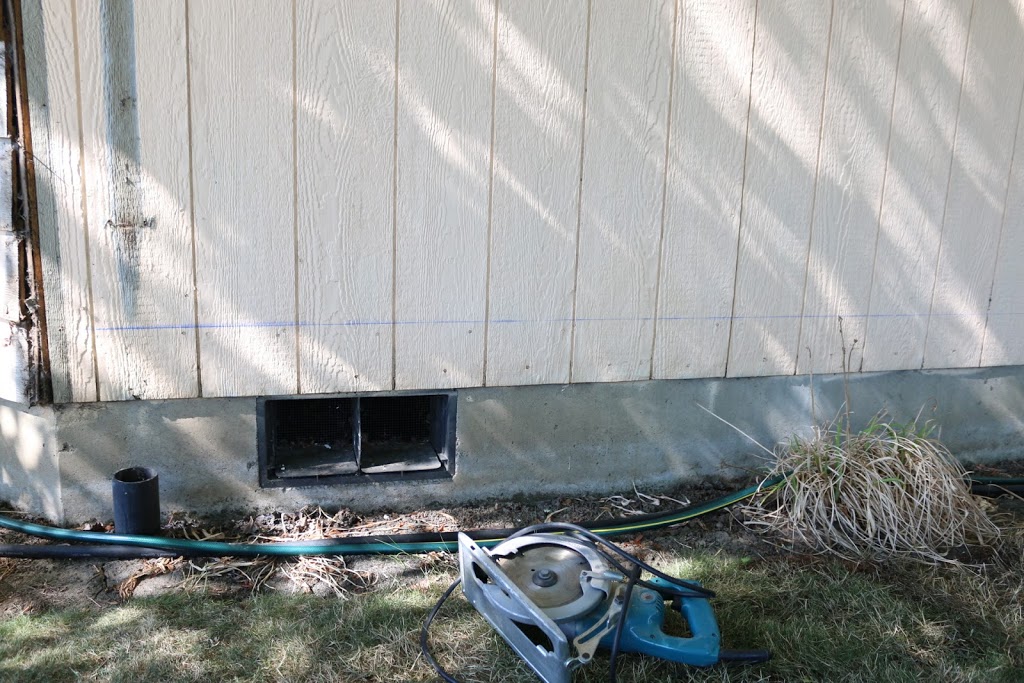
The cutting isn’t to bad. Simply set the depth of your circular saw so the blade tip to the guard band is only the depth of your T1-11 siding. In my case that’s 1/2 inch. DO NOT CUT YOUR STUDS!
A few learned hints, cutting this on a 94 degree Fahrenheit day is not ideal. Second, if you’re cutting make sure you do 4 feet segments, the T1-11 is in 4 foot siding interlocks and makes it easy to stop at these points. As you slowly move along the side of your house don’t stop for too long in one place. I found the blade would heat up the siding and kind of make a warm/smoke smell. You don’t want to catch your house on fire! I had a hose handy just in case and on occasion would spray a little water on my new cut seam right after cutting.
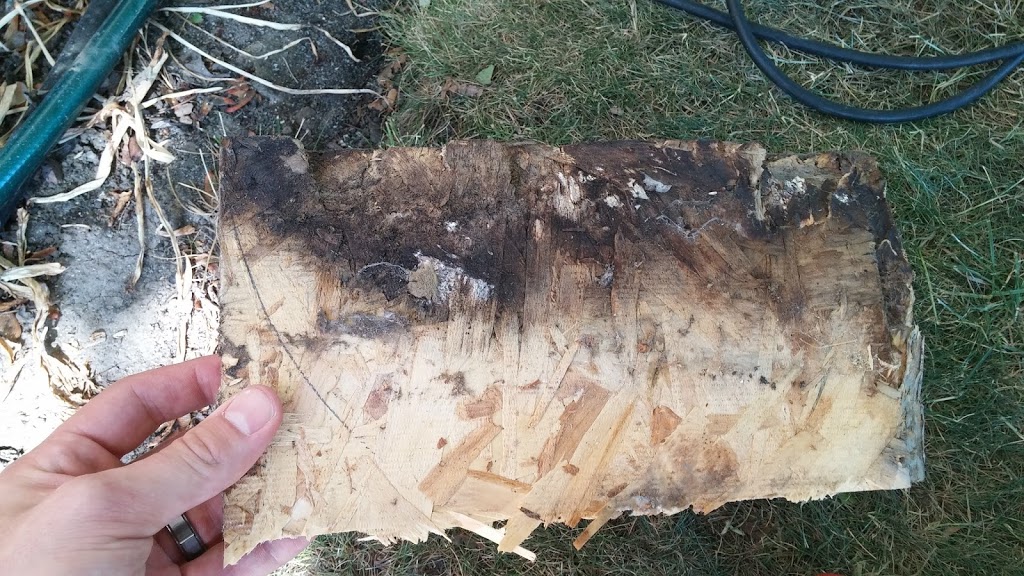
Once cut, take a hammer and pry bar and carefully chip away at your cut siding until removed. Should look something like the image below.

This next step I found online from a guy named Steve Hamilton. I love this idea! You pry out at each stud and right above drill a 2″ screw in the siding and stud, this holds the gap while you install flashing and vapor barrier. Genius, and a must do!!!
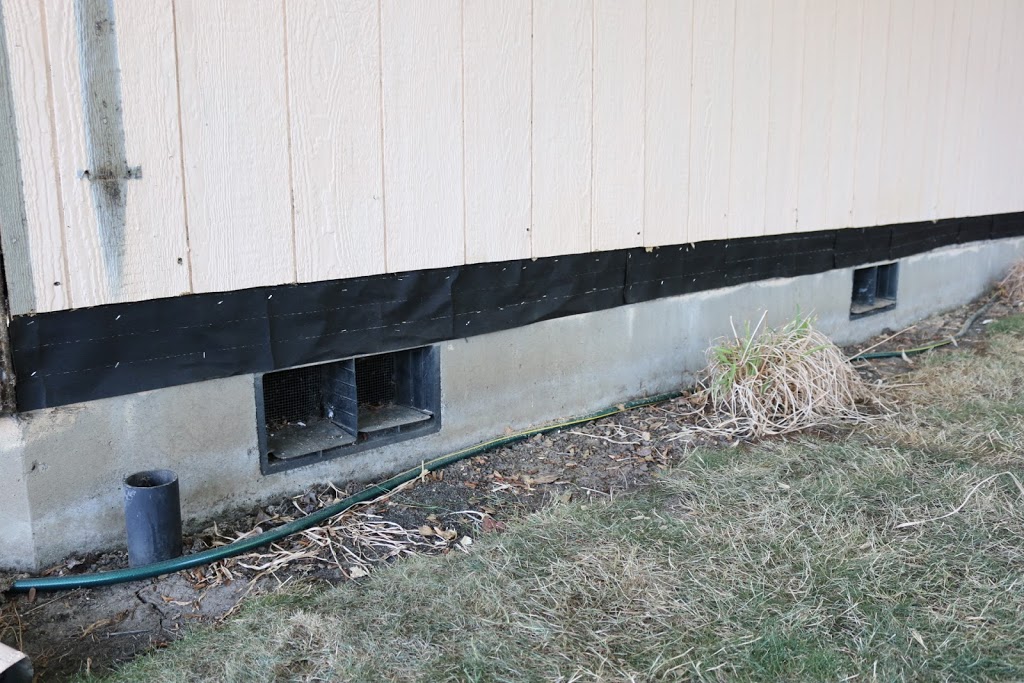
Once that’s done, paint and seal the newly cut under edge and add the vapor barrier as seen below. This is the best time to seal the newly cut board so it doesn’t rot again. Put on a couple coats of paint or primer as needed.
Maneuver your moisture barrier up as far as you can and staple it to your studs and joists. Make sure to overlap the barrier strips at least 6 inches.
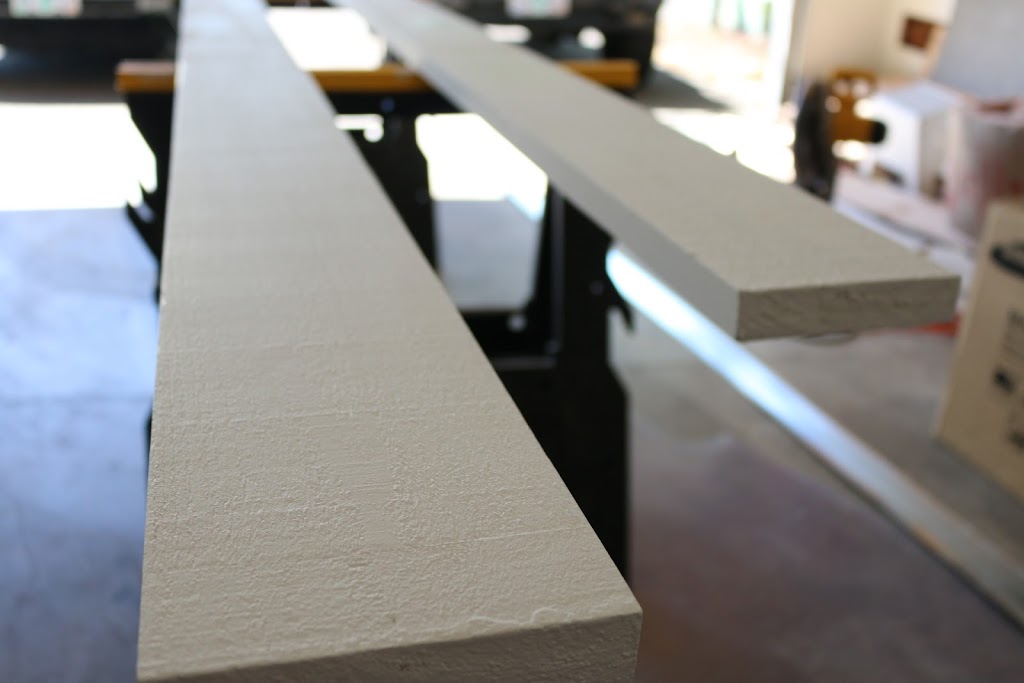
Before installing your new trim this is the prime time, pun intended, to prime and seal all sides of the new trim board before installing it to your house. Add one or two layers of paint until water proofed and looking good. While its drying we’ll start installing the z-flashing.
Z-Flashing is basically the shape of the metal flashing. Make sure its just over the depth of your trim piece. The goal of the flashing is to provide a transition piece for water between the siding and the trim board. It also lets moisture behind the wall have a way out, we call this breath-ability. If this wasn’t needed you could just caulk between the boards and be done. But breath-ability is very important. So don’t caulk between the flashing and the T1-11 siding! Make sure there is room for the drip to settle and don’t let the siding sit in the flashing. Leave about a 1/4 to 1/2 inch gap vertically between the just cut T1-11 and top of the flashing. Once nailed in, you can give it a slight bend down so water doesn’t pool up on the trim. The bend is optional in my opinion.
My flashing was purchased at HomeDepot but you can find it at many hardware stores. Mine was 10 feet long so it doesn’t meet the total length needed. Overlap by 4-6 inches for transitions and caulk between the flashing transitions. Use metal snipers to cut the final piece. BE CAREFUL WEAR GLOVES!
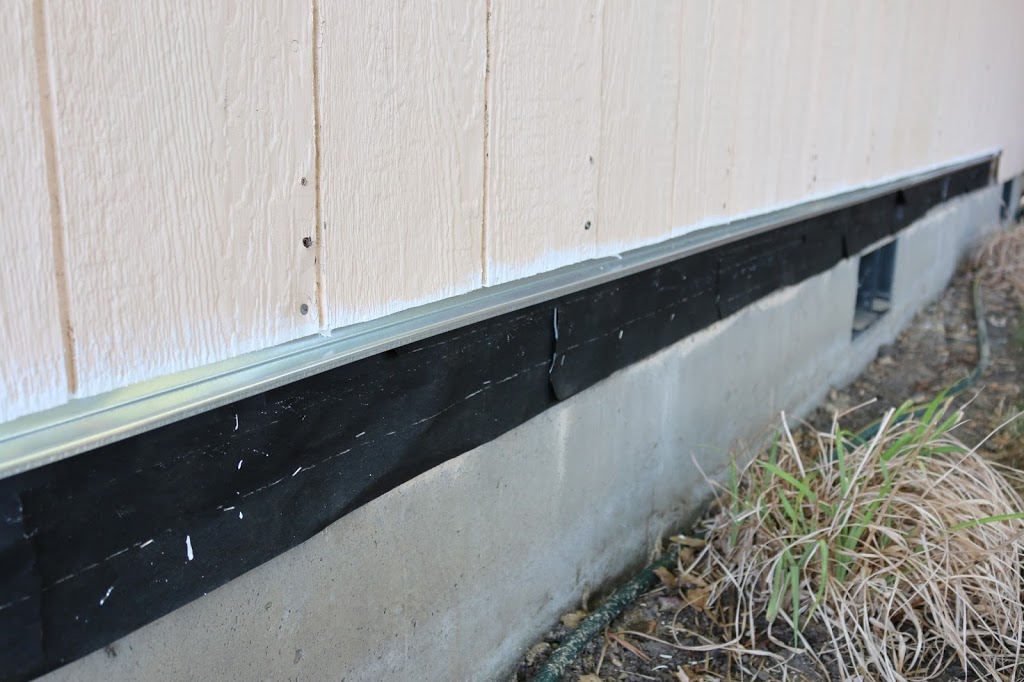
No need to caulk between the z-flashing and trim piece. Remember you need a way for water to get out if it got behind the flashing and trim.
When you go to nail your trim in, use 2 1/2 inch or longer galvanized nails.
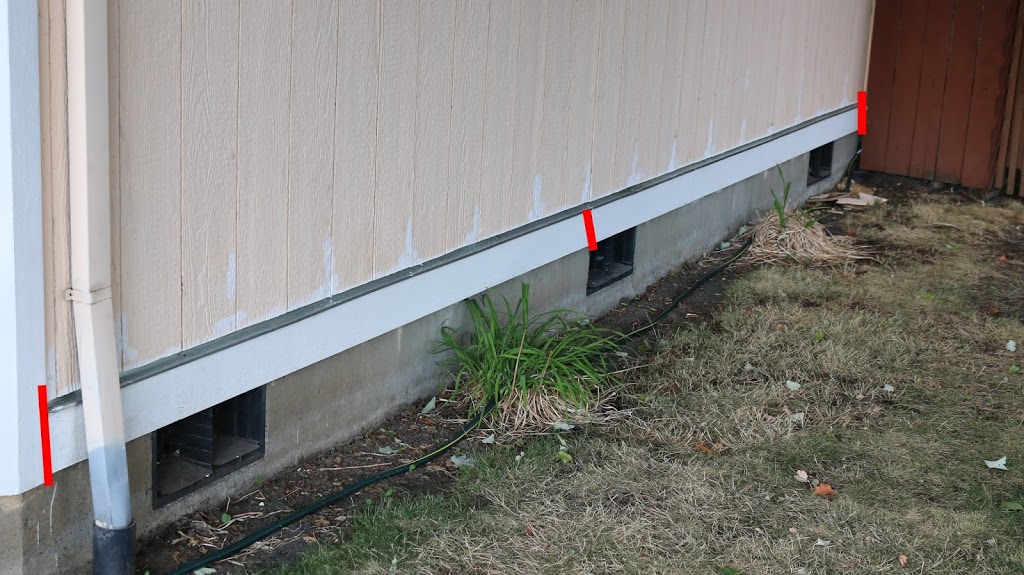
Once your trim is hung and leveled, use exterior paint-able caulk to seal the sides and pieces (see the red lines)below for where to seal. Between all transition pieces. You don’t want to seal behind the trim board and the siding. You want it to be breathable just in case moisture got behind it. If water were to run down the front, you don’t want it to go behind everything.
Once its all caulked, make sure you seal all the nails with caulk or paint. I put a layer of white paint that I had laying around over everything. Using the color of your house is recommended, so don’t worry we’ll be painting soon. 

Thanks for checking out my post, if you have question please let me know below.
Helpful links:
http://www.finehomebuilding.com/how-to/tips/z-flashing-retrofit.aspx
Hi Brian. I just put a bid in in a home that has T1-11 siding. I had read up on the downside of this siding here in Pacific NW. Sure enough there were same issues and you described. Very interested in same kind of repair you showed. Most of the damage does appear towards the bottom on back wall but did extend up higher on side wall. Would you just make belly band same height on all walls? How high up can you go with this kind of repair? (Vs just replacing entire wall of siding) thanks the all the pics and instructions. Most of them I understood. And at least maybe my SIL will understand! :o) You were a tremendous help!
Hello Darice,
Glad it helped you. Yes I would make all sides the same height, for look and appeal purposes of the house. I'd say you should go up no more than 8 inches. Most of the exterior trim boards are 4-8 inches wide that I saw. Honestly any higher might look funny too. At some point it might be cheaper to just replace the whole siding if your soft spots run really high up the wall. Doing everything myself I figured a was saving a few hundred dollars, but having a contractor do the work they may get a better price on siding. Either way, best of luck to you and thanks for reading.
Cheers,
Brian
I live in Kansas City, and this looks like the exact issue my house has and seems to be a very viable option to replacing the entire panels. Thanks for posting this!
This is very very helpful. I considered simply putting a trim board over the siding, but that didn't make a lot of sense to me. I started looking on This Old House and a couple google searches brought me to your page. I consider myself pretty handy, but your tutorial is the piece I needed.
This is exactly the thing I needed! I start work tomorrow!!!
Glad i could help, let me know if you have any questions while going through my tutorial. All projects will be slightly different, but hope it helps! Let me know how it goes…
Cheers,
Brian
Hi Brian
I also live in Portland and have a house almost identical to yours. I had the same problem on my house's south side, which gets the bulk of rain (weather system generally come from the south-west). I had a contractor install this and he did more or less the same as you, except he caulked between the siding and z-flashing. After considering your point I think that was a bad choice. All other Z flashing on my house is not caulked. Fortunately the fix is easy. I'll just, very carefully cut off 1/4 inch of T1-11 using my Dremel SawMax, which is a small circular saw ideal for fine cutting.
This is an excellent post thanks. I might add two points:
1) From the pictures you show it appears you have LP 'Smart' siding, not T1-11. T1-11 is textured plywood, whereas LP is basically OSB.
2) T1-11 and LP is in your and my case wall sheathing and hence part of the building structure. In the picture of the cut-way siding you see the mud sill on the bottom, your 2×6 tongue in groove floor boards, in the middle and the wall bottom plate stud on the top. To my understanding the wall sheathing is supposed to be attached to the wall bottom plate. I think you might have cut away too much?
Thanks Brian, this will work on my shed….
FYI, you can take the cutaway piece and bring it to any paint store and they can match the color exactly
Brian: I live in the Southeast and we encounter the same issues here.
My plan when I begin this repair later this spring, is to nail a piece of strapping to the siding for my saw to ride on while making the horizontal cut. Any thoughts?
Thanks for your article.
Russ Johnson – rjohnson040@sc.rr.com
This comment has been removed by a blog administrator.
Vapor barrier is usually attached to the face of fiberglass insulation. “Facing in”
Installing vp on both sides of a wall poses a moisture trap which should be avoided or dryrot may occure. That is, should you end up with entire walls vped on both sides.
Thank you so much. I believe this will work well for me. The only difference with mine is…I don't have a full on concrete foundation on bottom. It is a manufactured home and currently has horrible vinyl siding that I plan to replace. I probably will replace it with treated plywood or hardy board. This will need to be attached to the rim joist so I wonder if I should just place the entire treated wood from under the z flashing all the way to the ground?
I don't have a rotten sliding side, I am just building a shed and I have been eyeing the bottom of the sliding, thinking about should I calk it or seal it up. But I think I can just wait, it will keep dry here in California most of the year.
Thanks for the information, Nice to know more.
Nice post
Thank you John for the advice and comments. I know this is over a year old but life's been busy with kids and other house projects 🙂
I think you're right in saying i'm using LP siding… my mistake.
Anyways I may have cut too much off… but that is because of the balance of how far the rot traveled up the wall and how tall my 2×6 board I installed took up in order to not cover the foundation vents. I need to add a new picture, we just had the house painted.
Cheers,
Brian
We ended up getting the house painted this summer, so at the time I was just priming it holding out until we had time and money to paint it. 🙂
Cheers,
Brian
Thanks! glad you enjoyed 🙂
Cheers,
Brian
This is great. I recently purchased a house in MN that has wood siding. Once I moved in I started noticing more soft spots on the siding and was having an anxiety attack thinking about how much it was going to be to reside it. I will be giving this a shot before winter.
I do have an attached garage that is lower than the house and there is some rot where the siding touches the shingles. I’m not sure if I should try it on there or not.
Hi Brian: This article is going to be very helpful because I have this exact problem with the south side of my house in Portland and I also have T1-11. However, some of the images in the article won’t load.
Hi Mick,
I just checked the picture load problem in Chrome and IE and something was weird in IE, so i’ve re-adjusted some of the pics and removed some bad code on the page. Appears to have fixed the issue as the pictures are loading now. 🙂
Cheers,
Brian
Very Nice Information. Thanks so Much. Steve, Mad Dog Primer
I did this over the summer. My flashing and cedar board sticks out a little farther than the siding itself (fiberboard). After the first snowfall I’m seeing an issue of the snow landing on the flashing. This makes me a little nervous of getting water and snow on the edge of the siding for periods of time.
I’m thinking I should either caulk it or put something slightly above the cut edge of the siding. Like a drip cap or another board.
Looking for ideas.
Finally!!! A real solution for the problem. Same issue, deteriorated across bottom. Looked a long time for a fix, even paid a handyman who played the contractor game with me for a minute. Thanks for the detailed instructions.
I too am a fellow Oregonian in the greater Portland area. I don’t know who thought this siding would be a good idea in this area. Our house had extensive dry rot in the bottom 3-4’ of the house when we were buying it. Instead of replacing the entire siding, the sellers basically did what you did but used more of the t1-11 for the bottom portion instead of using the board along the bottom (obviously that wouldn’t have been long enough). I don’t know if they put any type of moisture barrier underneath and I’m not sure if the top part of the house is in good condition or not. The front of the house has lap siding I’m pretty sure needs to be at least partially replaced.
I think the main issue is that they house wasn’t painted very well initially. It almost looks like just a light layer of primer was sprayed on and some areas barely have that. I don’t want to replace the whole siding if I can avoid it. We purchased paint and primer already so I think one of these days after some steady rain I’ll walk around the house and test for soft spots. Hopefully we won’t have to replace too much. The South side definitely gets the brunt of the weather. I hope a couple good solid layers of paint will hold it over for a while until someday we can replace the whole siding. I don’t want to do it myself but on the other hand I really really don’t want to pay a contractor to do it.
Thanks for the post. It was really helpful. A special thanks for mentioning the breathability factor. I thought the contractors did a bad job by not sealing the two sections together but apparently they did the right thing. I’m glad we didn’t go back and caulk it.
It seems to me that you have seriously reduced the sheer value of the siding by detaching it from sill plate. Your belly band does not create a continuous shear panel. This would be critical is earthquake prone (like Portland OR) or high wind areas. I have the same problem in an apartment I own and have concluded that the proper repairs to replace all of the rotten sheets in their entirety in order to maintain shear. You are an engineer. Am I missing something?
Portland isn’t that critical of a location for earthquakes as you may suspect, living in the north west for many decades i’ve felt only a few quakes, so i’m not worried. Plus i’m not removing the studs which are the primary structural supporting frames. And if anything i’m certain removing 2-5 inches along the bottom paneling and replacing it with a more sturdy beam won’t decrease the strength, most likely improves it. My main concern with the belly band was breath-ability and weatherproofing. We get tons of rain and I don’t want it happening again. So far its been a a couple years and no leaks or problems that i’ve experienced. So i’m happy.
Cheers,
Brian
I don’t think he has any weaker a wall section that one with say a door and multiple windows in respect to sheer strength. As long as the corners are adequately braced, a single story will be more than stiff enough. If worried, strap brace from top plate to bottom plate internally using screws to anchor the strapping.
We also live in Portland area. Today we had a contractor come by to fix some dry rot areas in our t1-11 siding. When he took out a section…oh look…no barrier. Great. So now he has us thinking about whether we should redo all the siding on our 1996 home. It will probably be a $10,000 project. Yikes! We would look at getting something like Hardie plank or that cement composite stuff. Darn, and we just went with freinds to the Home show 2 weeks ago. 🙁
I just wonder how long we can wait. I don’t want to risk the frame getting any rot.
I live in the NW as well and T1-11 siding acts like a sheathing so as long as it’s in good shape you don’t need anything between it and the studs. Sounds like your contractor is trying to cash in. If you want a new style siding you can have it go right over your T1-11 if it’s in good shape. That’s why all T1-11 on these old homes don’t have a house wrap under them. My house is 1969 and the T1-11 is in great shape so for now I’m add the flashing and belly band and let it ride until I want to aesthetically change the exterior look and add a different style siding right over top.
I have T1-11 on my 38 year old house and it seems to be sound. however there are wooden drip caps at the bottom edge where it meets a horizontal trim board, and also along the bottom of the gable ends where the two t1-11 panels meet. these wooden drip caps have quite a bit of rot. They protrude and the horizontal surface is exposed to sun and rain. I’ve painted and caulked but it is a loosing battle. Is there something I can do to replace these drip caps, short of residing the whole house? perhaps with the Z-flashing? Or is it better to reside?
Hi Bob, sorry for the delay. Really hard to tell you what you need when i’m having difficulty understanding your issue. Have you taken pictures and talked to a hardware store or local contractor?
Cheers,
Brian
Brian,
Where did you get the z bar with a 1 1/4 ” ” B” seat ? All I can find has 3/4″ ” B ” seat length.
Hi Jeff, I got the Z flashing from my local Home Depot. I’d have to go find some scrap at home and measure, so sorry I don’t know the size I used. I simply found a base board I was going to use for the belly band and found flashing deep enough to over hang the board a little.
Cheers,
Brian
I am planning a similar project, but I have numerous fixed pipes/conduits and a fence post in the way. Any good ideas for removing the siding from behind those obstructions?
We have a barn where the wood goes all the way to the ground. At ground level there is some rot and critter holes. Can I cover that up with a piece of metal all the way around? If not what is a good way to take care of the bottom of the barn without replacing all the wood?
Great job, only part that unclear to me is what u did behind the vertical trim. Do u hv the zflashing go underneath it?
Window Drip cap can be used for the z flashing and is available in 1″, 1-3/8″, 1-1/4″, 1-1/2″ or 1-5/8″ (deck flashing, find it at your local building center. I am doing this type of repair on a home, and need different flashing’s for each area. You can also purchase a PVC Trim Board designed specifically for the bottom trim board or as some manufactures call it, a starter strip. It will never rot.
Hi there. Just about to start this project but I cannot find asphalt roofing paper (tar paper). I can find roofing felt but I don’t think that will work. It is thicker than paper. Any suggestions?
Did you do all the sides of your house? What is the estimated cost vs. hiring a contractor?
Sorry for such a long delay… My family recently moved and we just had another kid. LOL a little busy.
To answer your questions, no I didn’t do all my house, just the south side of the house that was showing the soft spots. Secondly, I never got an estimate from a contractor. Probably cost me <$200. Cheers, Brian
Awesome, thank you for taking the time to even share this. I definitely look forward to implementing the information provided on here. Keep up the great work!
–Landscapers Fresno
Thanks for this great post! Our mid-1980s home has T1-11 siding. We are replacing several of the T1-11 4×8 siding panels ehere moisture damage has occurred. However, on several of the panels we were planning to replace, the moisture damage is only at the bottom . . . similar to what you experienced.
I did have a devil of a time locating matching replacement sheets, but I finally did. That gives me some concern about availability if needed in the future.
However, before starting the project, I saw your post & I believe just trimming those I can at the bottom & adding such a “banding board” will be a much more cost effective approach for those particular panels. Of course that means – so it all will “look the same” – I’ll have to do the same to the other unaffected panels as well as to the replacement panels as they are installed. Nevertheless, I believe doing so will be much more protective and will provide the best insurance against having to find & replace more siding sheets in the future.
However, one thing I didn’t see in your article (I apologize if I missed it) is identification of the material you chose for the banding boards themselves. In the painting photo, they look like real wood, but I couldn’t tell for certain.
Assuming they are wood, do you have any thoughts or advice about instead using trim boards made of pvc or fiber cement? It seems to me that either might hold up better/longer that wood (even painted) located that close to ground level, but maybe there are negatives I’m not considering. What do you think?
Thanks again for the great article!
Paul
I’m preparing to replace the lower 4-5 ft of vinyl siding on one wall of garage with T1-ll siding. Backyard baseball play has made some big splits in vinyl. Grandchildren are excited about having a good wall for tennis practice also. I’m debating how to manage the transition from vinyl on the upper part of wall to baseball-proof T1-11. Your project is very helpful in my planning. I’m going to treat it like a 5 ft deep “belly band”. I think I’ll end up re-installing a course of vinyl siding over the Z-flashing — or maybe not. It would be tempting to go all the way up with T1-11, but the transition from soffit to siding is really well done. They’ll grow up, and I’ll re-install vinyl. I want it to be easy to go back,
This is a great presentation. I have been pondering ways to retrofit a Z flashing for the ledger board on my deck. The previous owner did not put flashing up under the siding and down over the ledger. Luckily, the ledger and that wall are under a roof overhang that has shielded it from most rain and moisture, and the ledger is still solid with only one spot about a foot long showing some minor rot on the top edge. I can repair that but I want to flash it so it doesn’t eventually rot and take out the house rim joist with it. I have been thinking over ways to cut the siding and get some flashing in behind it. With a little flush-cut saw like a Dremel Ultra, I can cut out about a 1″ high band, pry the siding away gently, and get the flashing up behind it like you did. Good work, man.
Hi Brian. I have this type siding, or a similar siding (called Smart Siding), on my house and workshop in Alabama. I think its cellulose. The siding panels are 4′ wide x 8′ tall. My question: There is (one) panel of siding 1 ft wide because its at the end of the house. It has an outside water faucet through it. Currently, the faucet is about 2-3 inches from where two panels join. That could be changed pretty easily since the water pipe is PVC and can be easily repositioned. This one panel is soft at the bottom 2 inches and runs 1 foot long. Its not yet crumbling like yours was. [Probably caused by spray from the water hose over the years]. Since all the rest of the siding panels are good I don’t think I need to do the trim all across that whole side of the house like you did — although that is an option. I just need a solution for that one spot. Before I read your post I was thinking about just cutting out the whole area around the water faucet and covering it with a 1/4″ board (primed and painted) with a hole in it for the faucet. That way it would look like just a secure way of mounting the water faucet. But that presents a problem because the faucet is 8″ above the bottom of the siding and I thought it might look funny, not to mention that the faucet is 2-3″ from the edge of that panel. I suppose though the 1/4″ board could be extended further to the side to make it look better. As mentioned the pvc water pipe can be easily re-positioned if necessary. Do you have an idea for this problem?
I realize this is an old post but I had the exact same problem and executed the exact same solution. Then after the fact, thought about this: The siding is in fact the sheathing that provides the rack and shear strength of the wall. By cutting off the bottom from the sill plate, how much have you reduced the shear strength of that wall? The bottom of the “sheathing” is now unattached from the sill plate.
The detailed instructions for removing the damaged siding and installing the new HardiePlank panels are easy to follow.
You mention that some homeowners might choose to hire a professional contractor for this project.
Any suggestions on some factors to consider when deciding whether to replace rotten T1-11 siding as a DIY project or hire a professional contractor?
Thank you for this post. I am about to fix the same issue on my house. This tutorial was easy-to-follow and I am feeling confident this can by a DIY project.