Want a Christmas light show that will wow the neighbors?

This easy tutorial was put together to help the average person that knows nothing about Smart Pixels get off the ground running. Though I am assuming you've already read my Intro to Smart Pixels - Part 1, an entry level post on technology terms, controllers and more. This is 'Part 2', which will guide you through simple preparation, house layout, and power management planning (will not cover programming the light show).
I'll introduce you to the concept of Smart Pixels and i'll talk plenty about gotchas, things to avoid and things to plan for.
PS. I'm not sponsored, everything you read is my personal opinion about the industry 🙂
My 2017 light show with under the eave lighting, two medium sized trees (372 Smart Pixels)
Step 1:
Get an idea of what you want to do to your house, do you want borders, trim, doors, a mega tree? If this is your first year (like mine was, keep it simple stupid) and start early (summer time!). If it's November and you're just starting, its too late. The sales are gone, and by the time you get everything, test it out, setup your house, write the light sequence, work out the kinks... its almost time to tear it down. Trust me I started planning in the summer, read a lot of blogs, tutorials, watched countless YouTube videos then bought my controller/lights in early Oct. Nothing gets you more experience then sitting down with your first set of lights and turning them on.
So for step one, I recommend you keep it simple. Get the basics down, then step it up next year. Maybe outline your house this year or add a couple decorations for starters. Once you have that figured out its time to figure out how you'll lay it out. DON'T WORRY, its a lot to handle, but i'll show you how.
My step one... I wanted my house to have under the eave lights so I laid out where they should go. Creating groups that would be easy to connect to each other. In my example you'll notice 3 groups (that I used for my pixel controller ports Orange, Green, Purple).
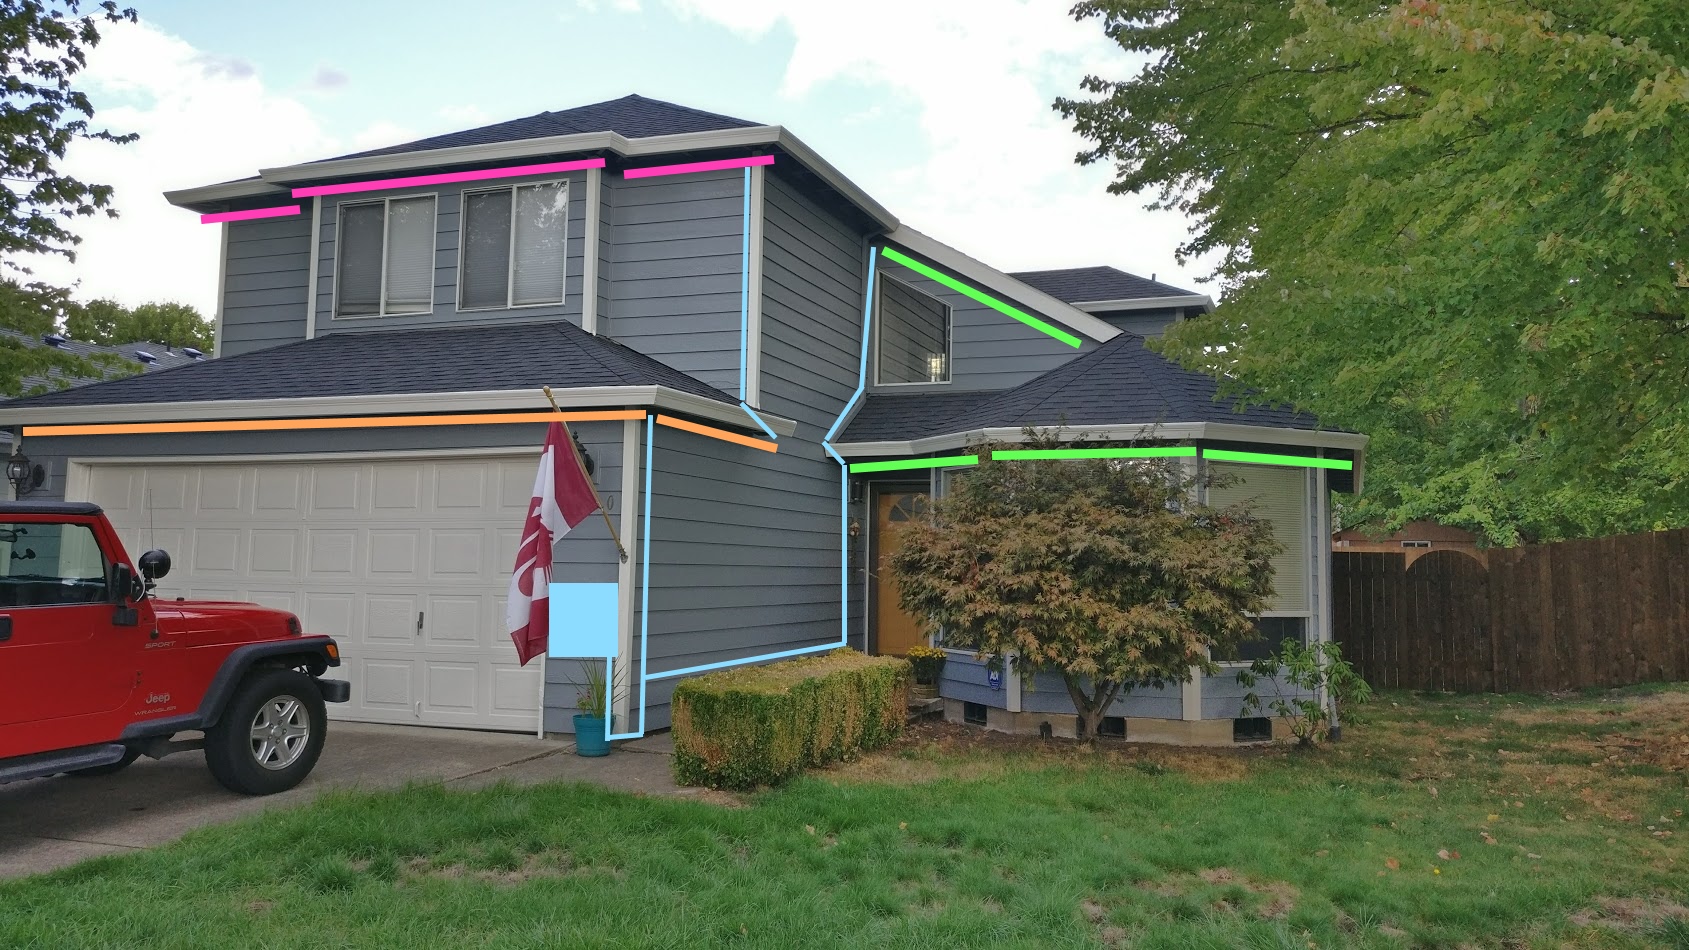
Its also important to know that pixels need to be laid out in a specific direction (this doesn't affect how they blink) but if you're connecting multiple runs they all need the data line to go the same direction in and out of each pixel. Because of this my green section actual starts at the top and connects to the bottom section.
Step 2:
My biggest mistake my first year was controller placement. Meaning where I put my pixel controller and where all my wire runs and long strings of light had to travel around my house was an issue. I highly recommend doing short cable lengths (less than 30 feet), and keep all your wires 18 gauge or larger. Anything over 30 feet before meeting up with your pixels will likely require power injection. My original pixel controller was located on the left side of my garage, but next year it will be like the above picture on the right side. In addition to making sure your layout has wires less than 30 ft from the controller to the first pixel, runs should be less than 100 pixels if you don't want to power inject. (A future post will be on Power Injection)
Important to note wire gauge is determined by its diameter (larger diameter means more voltage travels farther with a smaller amount of power loss). Wire gauge is written as 18AWG (American Wire Gauge) and the smaller the number, the larger the diameter of wire (logically sounds backwards, but don't worry about that). I don't recommend 22AWG or 24AWG.
I've setup a wire length calculator to help those that need to figuring out the usefulness of different wires gauges and to add some logic to your decisions. Most smart pixels run at 5 Volts or 12 Volts and currents are up to 5 Amps. I recommend minimum voltage drops (use something like 2-3% to be safe). If you are running really long copper lines near the maximum recommendation and want to connect 50+ pixels you may still need to power inject.
Maximum Wire Length Calculator
The calculator can be used to calculate maximum length of copper wires.Voltage (volts)
Current (amps)
Wire Gauge
Voltage Drop (%)
(Calculated Voltage Drop Results)
(Calculated Length Results)
Step 3:
Picking out your smart pixels is the next step. Its important to understand there are lots of variations, costs, and decisions to make around this step. Choosing your smart pixels will depend on a few different factors and a few important questions to always understand. Check out my post on Intro to Smart Pixel
![]()
![]()
![]()
![]()
Square / Bullet / Strip / Module - Forms of Smart Pixels
FAQs: Important questions you ask yourself:
- What kind of pixels do you need?
- What voltage do you need?
- What is the power draw of your pixels?
- Are they water proof?
- How are you going to mount your lights?
If you know the answer to these questions, you're ready to buy!
Answer 1) Most smart pixels have the same WS2811 integrated circuit, so its all about LED brightness, number of LEDs, power draw and flexibility of your setup and what you want to create. This will determine where you start and what kind of pixel you need to buy. For my house I bought module pixels for under my eaves because I thought they would be easy to setup, comes with spacing and had 3 LEDs per module.
Answer 2) 12 Volts vs 5V. This step is a tough one and if you look at it logistically there can be pluses and minuses to going with either. But generally speaking its safe to say that 12V systems will go longer distances, are more forgiving and are the more popular choice. So my recommendation if you're just starting out, is make sure your power supply and smart pixels are all 12V.
![]()
Answer 3) The power draw of your pixels is important to keep track of. If your pixel controller has ports with 5 Amp fuses in-line then you don't want to draw more current than you can supply. The easy way to calculate this is to divide the max current by the current per pixels. If I looked up a bullet pixel from Ray Wu's store I can see an example of "66MA" (this is really 66 mA (milli-amps)). Meaning you can calculate:
Max Current / Current per pixel = Number of pixels. Example: 5A/0.066A = ~78 pixels
Suggestion>> You could do more pixels if you don't use the max amount of current. I ran into a couple problems and worked around this as I was trying to run 100 pixels. My first suggestion is you understand Red Green Blue LEDs mean there are 3 diodes and all need to be on to create white (max current draw for the pixel). So during your initial test set the lights to white. If they flicker, look pink, or don't turn on, then you may have a voltage problem. Before rushing off to power inject, try turning the brightness level down to 10% and work your way up until you see your limits (no flickering). If you can handle 30-70% brightness you're probably fine.
Answer 4) There are multiple types of water proof pixels. Some will simply say 'good water proof' others will say 'IP67' or 'IP68' rated but most are epoxy resin filled around the IC chip.
What does the IP67 or IP68 rating mean?
IP - Is the International Protection marking by the International Electrotechnical Commission
6 - The first digit represents a resistance to dust and dirt.
7 or 8 - The second digit represents water resistance. 7 meaning 'ingress of water in harmful quantity shall not be possible when the incosure is immersed in water under defined condition of pressure and time (up to 1m of submersion)" general protection last for 30 mins. While the 8 represents 1.5m for the same 30 mins of time.
Basically either will do you just fine in rain or sitting in a small puddle of water. Just make sure you get one of those ratings for outdoor usage.
Answer 5) For mounting my lights under the eaves I went down to my local Home Depot and bought some EZ-Cable clips (see pictures below). These were screwed under the house eves instead of using the sticky backing on the back of my modules. I found the stickiness didn't do such a good job and fell off when tested. These mounts if spaced far enough apart allowed me to adjust the angle the lights under the eves of the house.
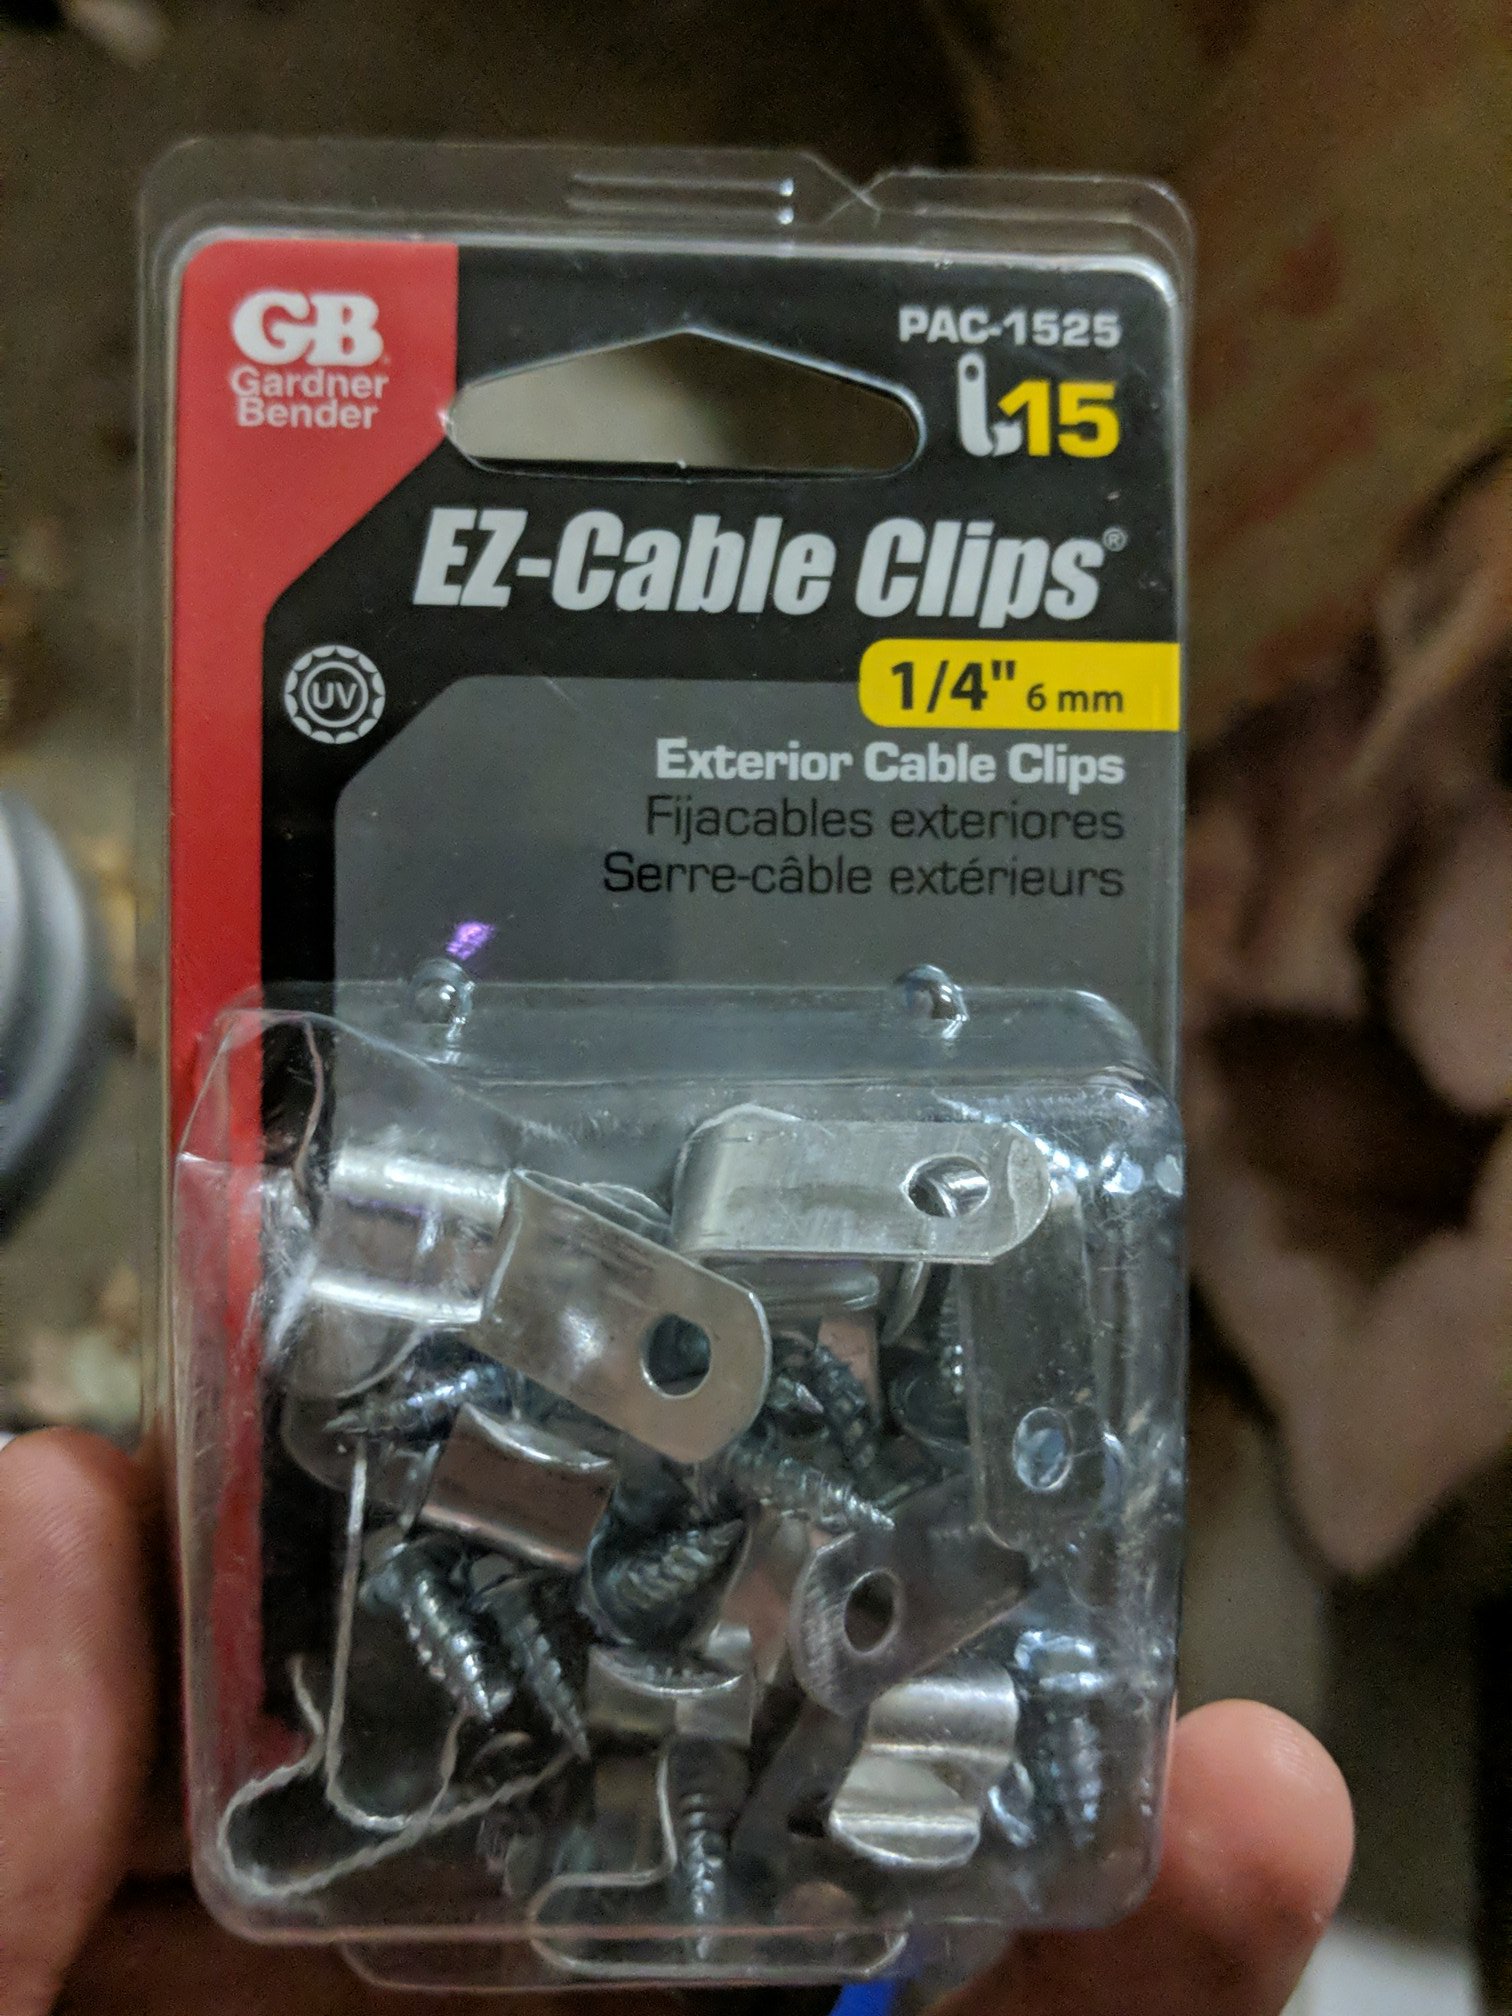
Here are my mounted model pixel attached under the eves.
![]()
Step 4:
Buying the controller and PC brain is the next step. I'll reference pieces of the image below that I put together to represent my setup.
![]()
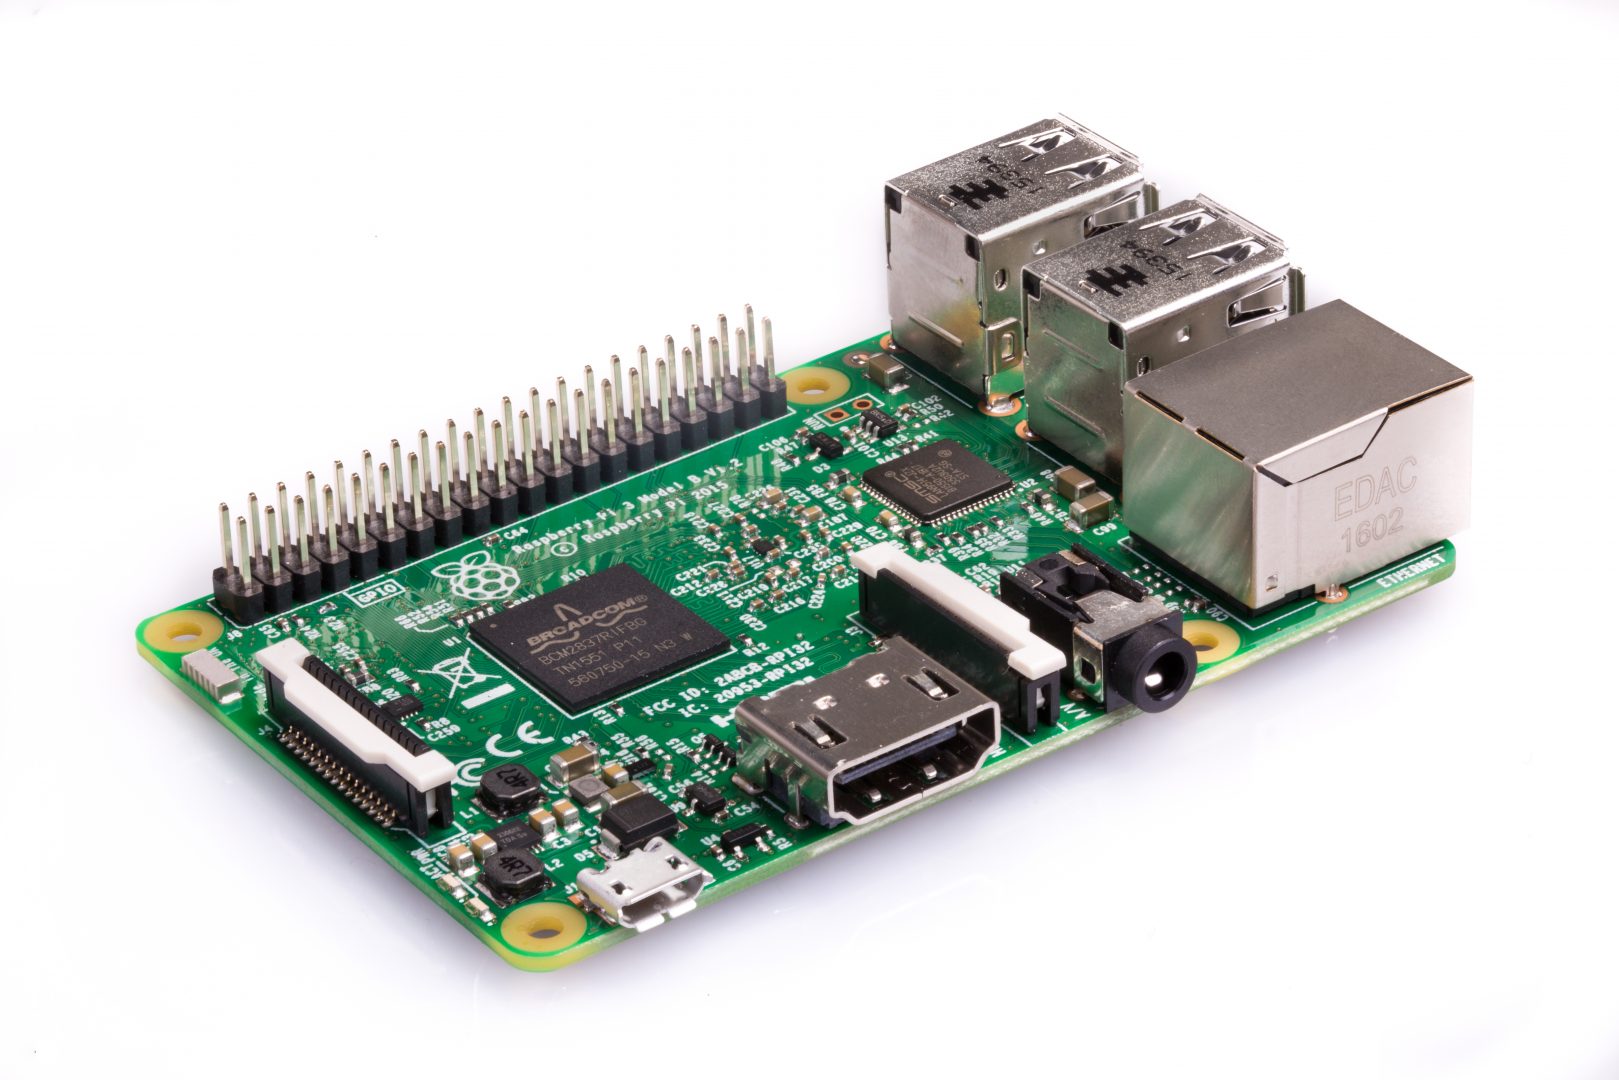
Basically you need a Brain (just upgraded mine to a Raspberry Pi 3 version B). This is a small computer running Linux on an SD card, the hardware is a Quad Core 1.2GHz Broadcom BCM2837 64bit CPU with multiple USB 2.0 device ports, WiFi 802.11n, Bluetooth, HDMI, 3.5mm audio out, and other I/O ports. For only $38 on Amazon its an easy buy and must have for a light show to control your light show via E1.31 protocol. Also makes it easy to remote into and control the show via your phone. Convenient!
Once you buy one and get a USB micro-B cable to power it, you'll need to install Falcon Player on it ---> INSTALL Instructions for FPP
The FPP software is an in house server on your local network that you can connect to and run your whole light show schedules, test your setup and more. For instructions on setting up the networking portions so you can communicate with the FPP and Falcon Controller (if you buy that controller), check out my Networking Tutorial post here.
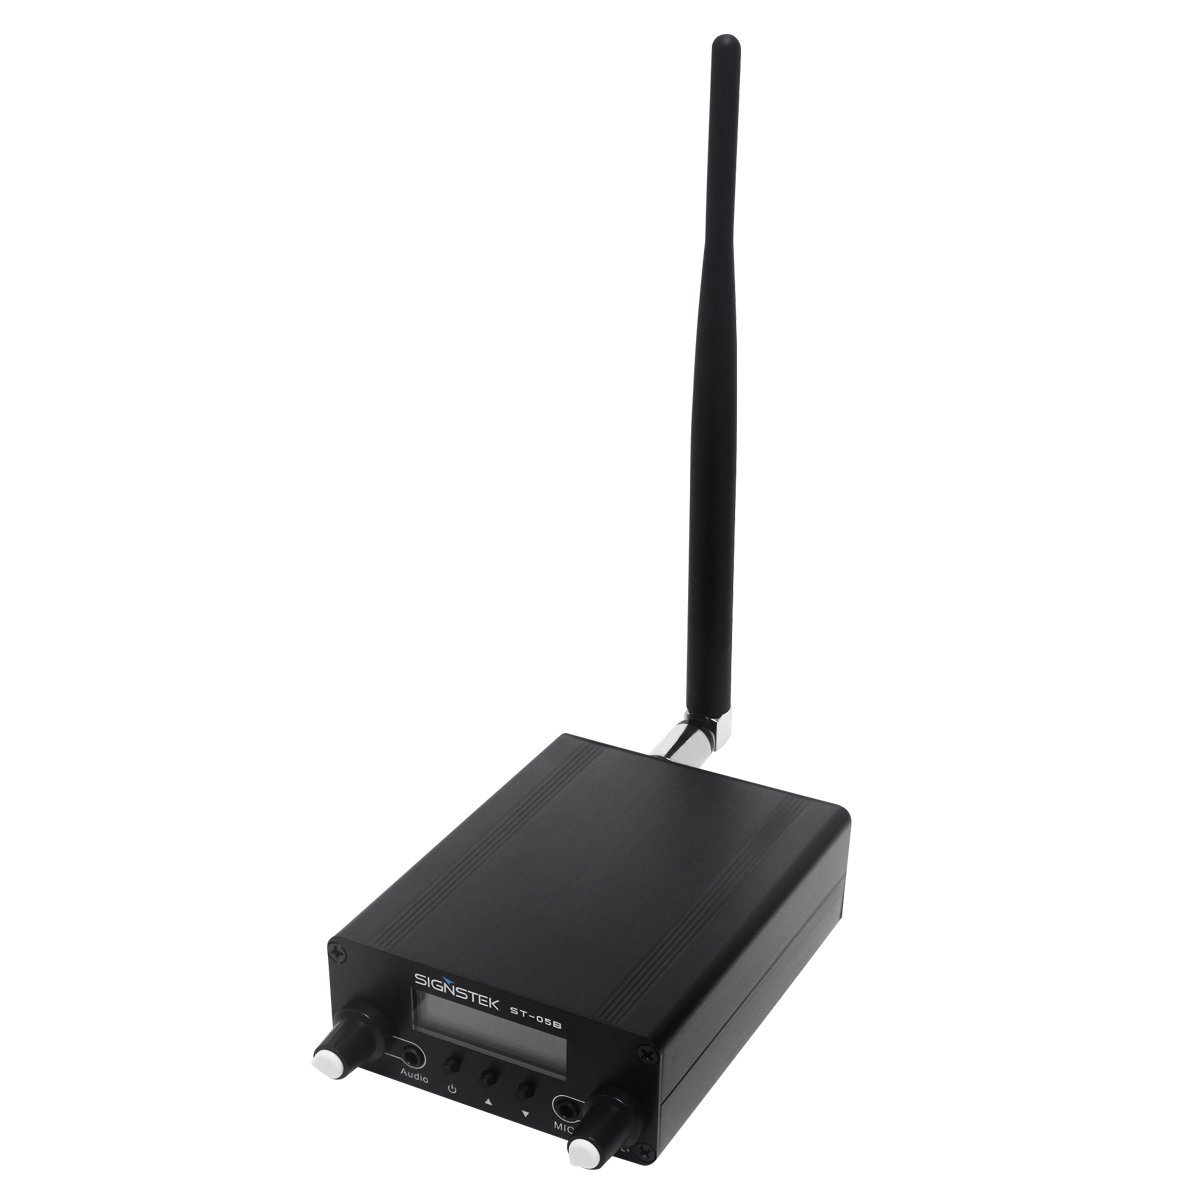
If you're eventually looking to create a light show that is synchronized to music, use the 3.5mm audio output jack of the Raspberry Pi 3 to connected a FM transmitter (just bought this one on Amazon for next years Christmas show - pic below)
Finally you'll also need a pixel controller. Something to handle the communication from the Brain and connects to the lights. The best website to compare specifications to help make an educated decision on smart pixel controllers is this link >> http://nutcracker123.com/nutcracker/rgb_controllers/ I bought a Falcon F16v3 for a variety of reasons including future proofing the number of ports i'll eventually need.
For starters when picking a controller its easy to get lost in the specs. But here are a few things that matter (in my opinion):
- Future proof yourself (If this is your first year, I find it worth the extra $80 to buy 12 more ports on the Falcon)
- Each Falcon port can handle up to 1024 pixels (about every 100 pixels needs power injection)
- DMX / expansion ports / daisy chaining controllers – allows for future proofing or to run a 100+ foot extension to another section of your house
- Webpage setup – this is really nice, you can connect to the board remotely by IP to configure it. (check out my other blog post)
- Make sure you have an active community for resources. I found the Falcon Community and others are great!
If you’re starting your first light show check out these popular controllers:
- Falcon F16v3 ($200)
- PixLite 16 ($220)
- Sandevices E682 ($180) (Some have cheap $$ options for letting you solder it yourself)
Step 5:
Other required items are the power supply that powers the pixel controller, a box to keep everything in (water proof is recommended by the community) and mounting hardware. Below is my setup and a list of the accessories I bought.
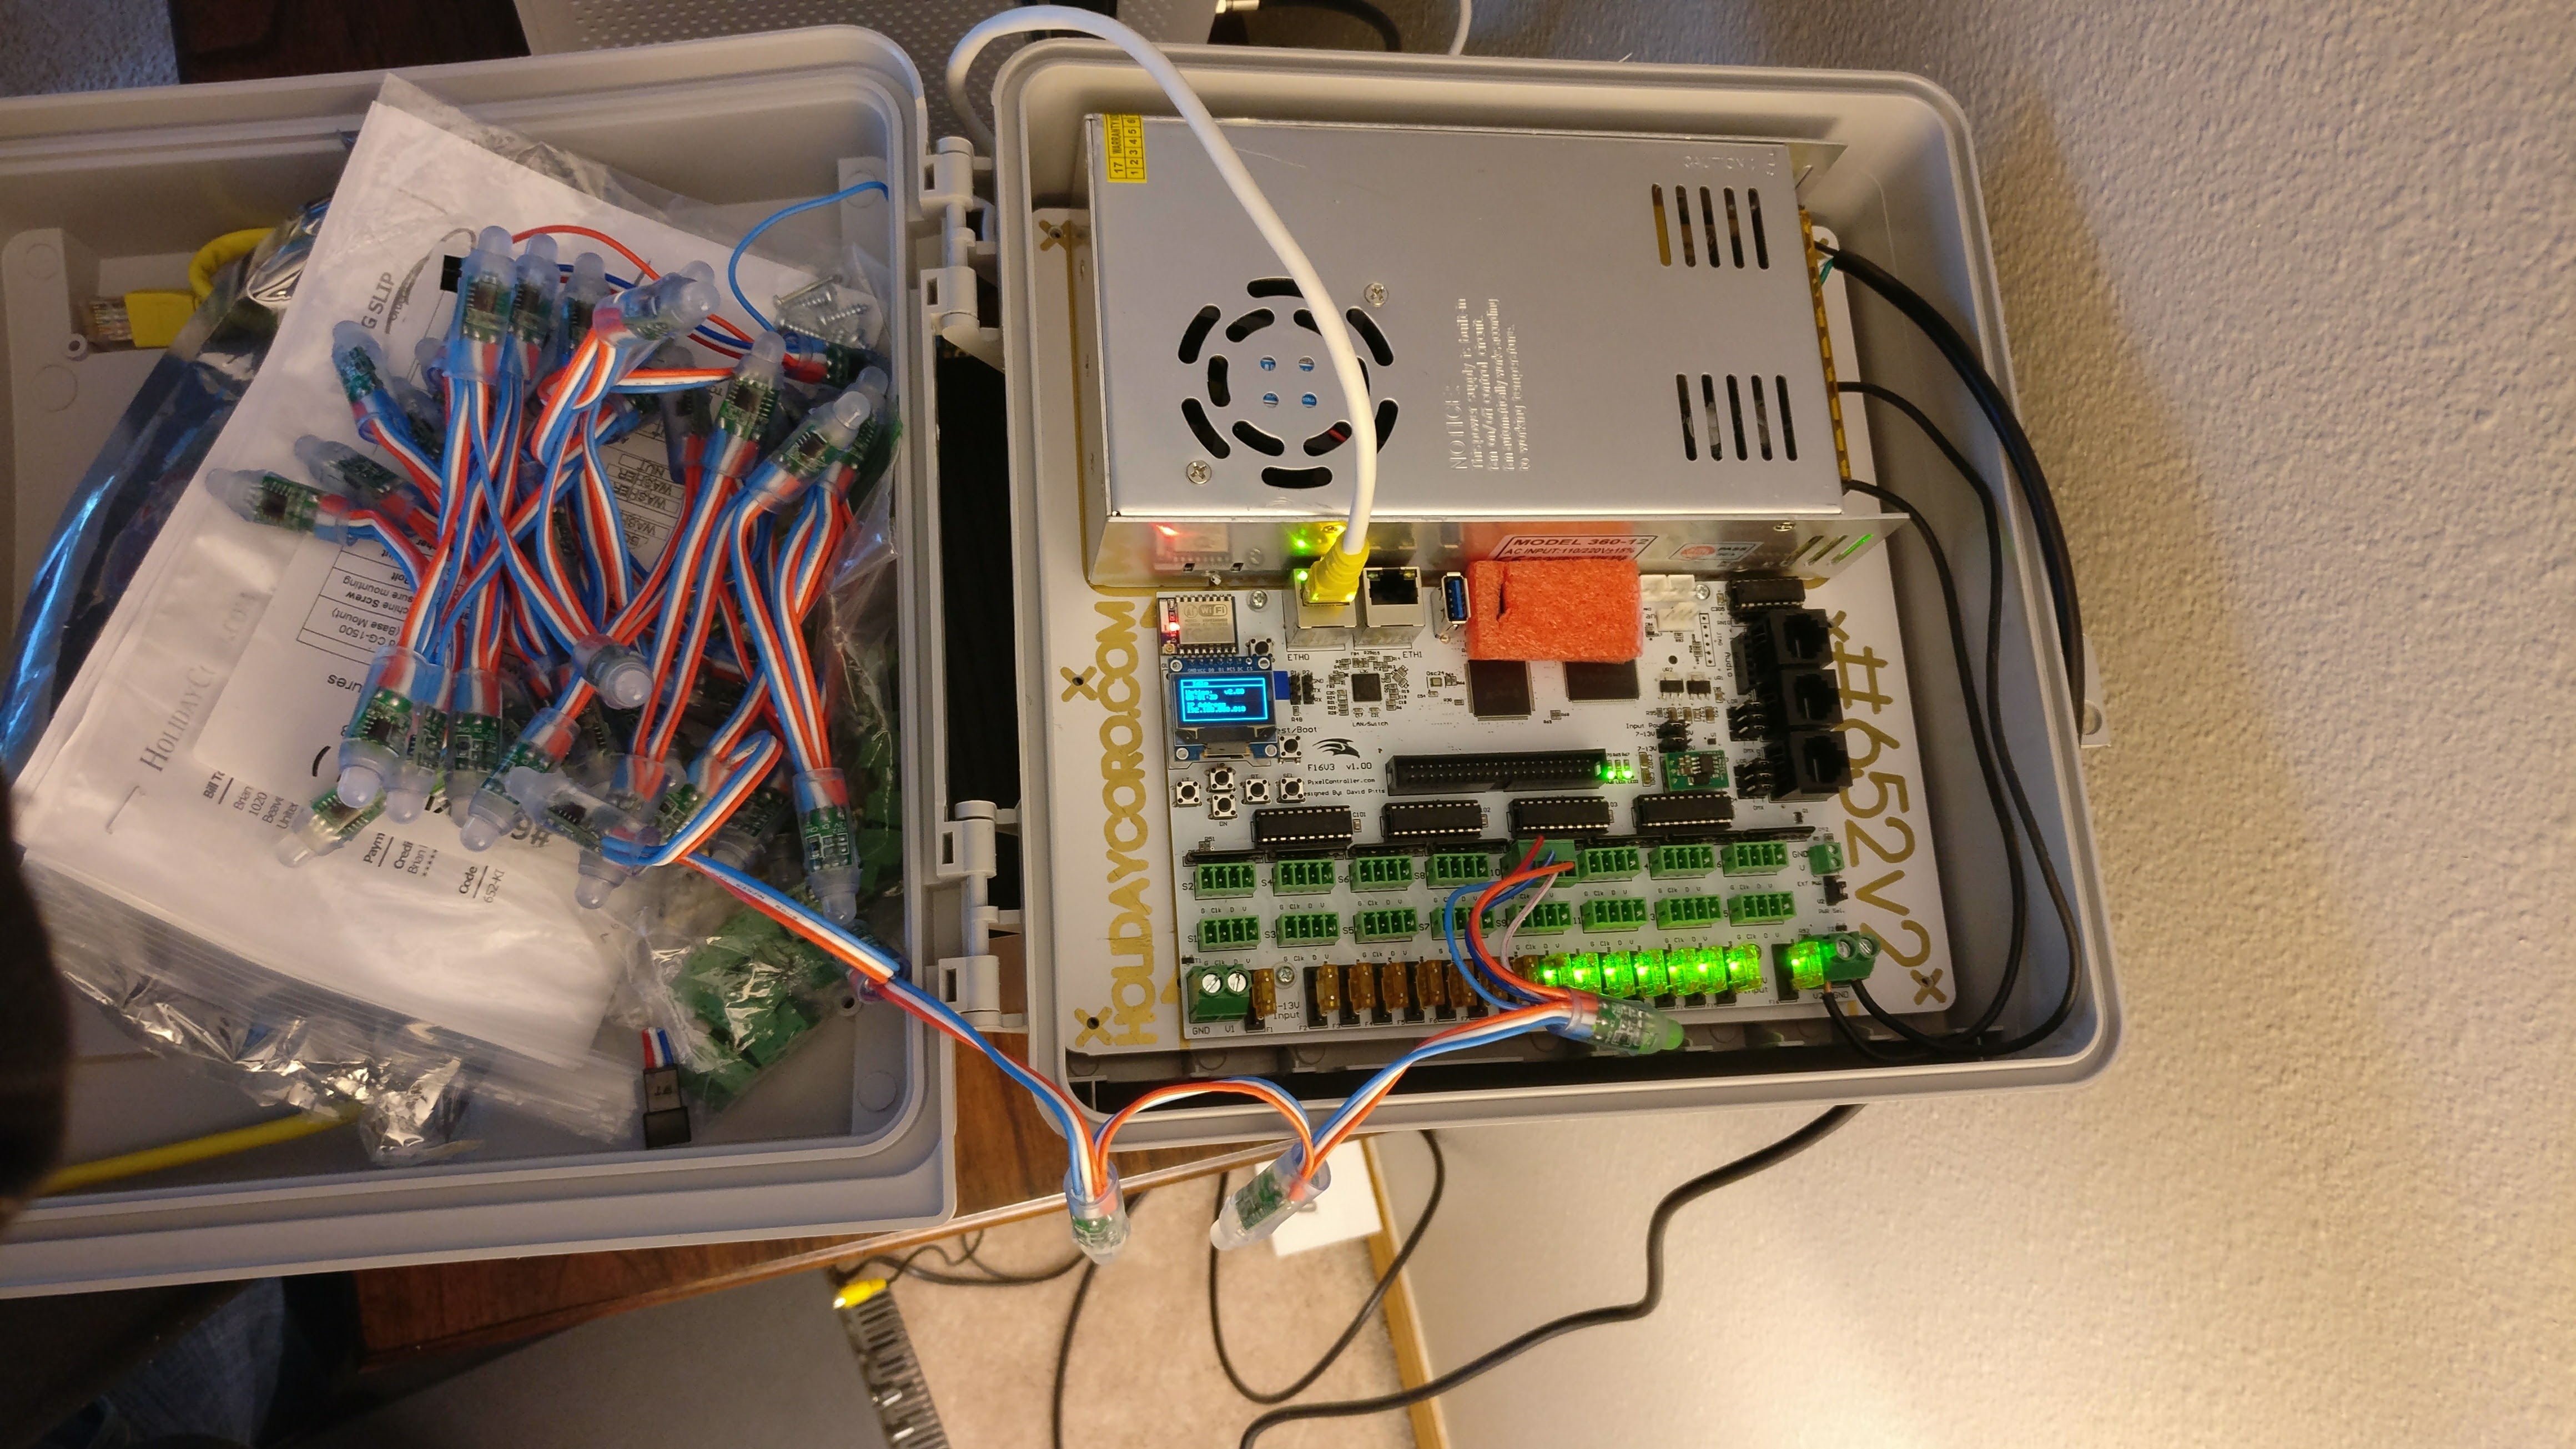
- $12 Mounting Kit - By HolidayCoro
- $22 Water Proof Case - From HolidayCoro
- $18 12Volt 30Amp Power Supply - From Amazon
- $4 Power Plug Cable - local hardware store
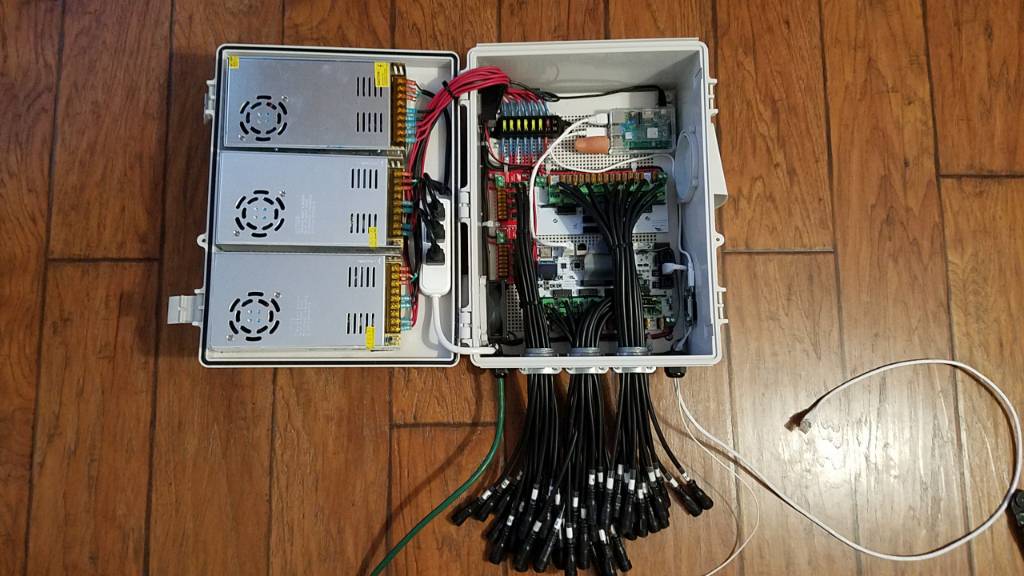
Once you get everything, or decide how to mount all your items, do so in an organized manner. Some are OCD about their setup and should be applauded for their attention to detail. You can find some very nice examples (I found this one on Falcon Christmas Forum) as nice setup example of how wires are organized, power supplies are nicely fit, everything is in a nice water proof box and 'pigtails' are used for connecting to their smart pixels and easily disconnecting them when light season is over.
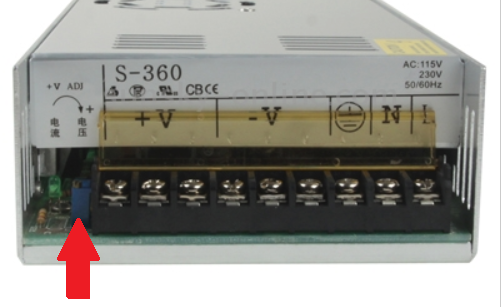
Step 6 (power supply calibration/setup):
All devices including power supplies have some amount of error. So when they're first turned on to a controller ideally you want a perfect 12V, but that is not always the case. So to calibrate your 12V DC 30A power supply there is a small adjuster screw on the front. Take a Digital Multi Meter (DMM) and check the positive to negative side and using the potentiometer (adjustable resister) screw located to the left of the +V and -V; adjust the voltage to read 12.0V, make sure its something like 11.8 bolts to 12.2 volts. And before turning on the supply make sure you properly setup the Hot, Ground, Neutral wires.
Once calibrated, turn off the power supply, and wire the V+ and V- to the controller you purchased. Should already have wired the Ground, Neutral, Hot to a 3 prong 120 Volt plug (see example below)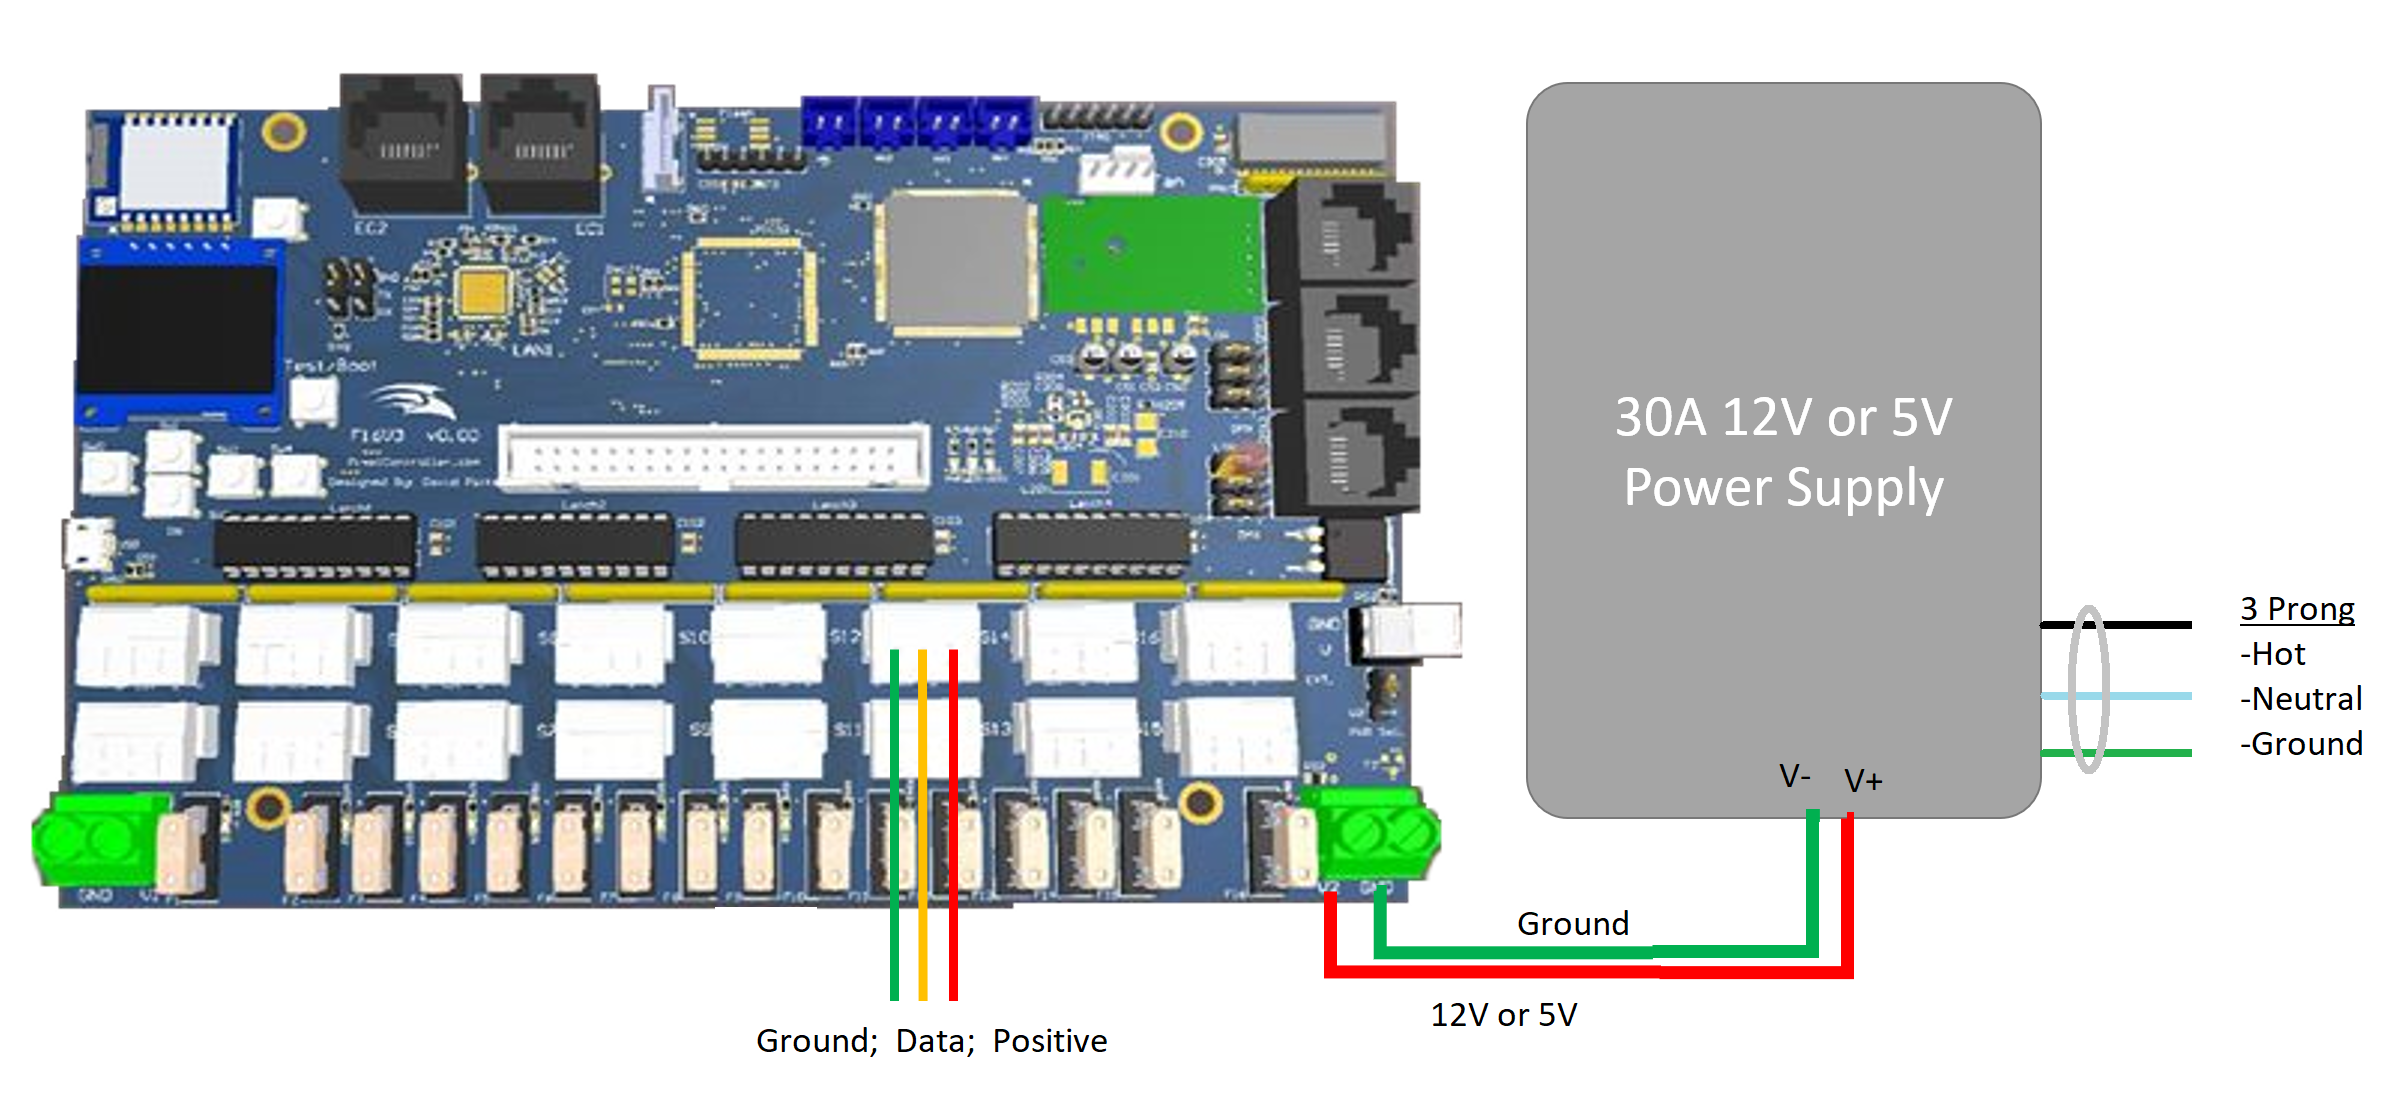
Step 7:
Make sure the pixel controller is setup to receive 12V DC and not 5V. Read the manual to figure out if a jumper needs to be changed before turning on the controller. You'd hate to ruin it on its first power on. Once this is confirmed, turn on the power supply and watch your pixel controller power on. If you have a Falcon F16v2 or newer, you should be able to plug an ethernet cable to the upper side of the controller to a network router, which will setup a DHCP IP (or set it manually) to get an IP address. Then type the IP listed on the display it into your local PC browser. This serves up a webpage which will be the beginnings of where you'll control, configure and setup the number of pixels per channel. This is also were you can test pixels are working, how many pixels per channel, any extra fans, temp monitoring and much more. (A future blog posts will cover these features)
If you have questions or suggestions please reach out to me by email or leave a comment, I read them!
Extra Suggested Readings / Videos:
Fantastic tutorial by Andy Harrison:
https://www.youtube.com/watch?v=F64WMD__MRo
http://blog.holidaycoro.com/2013/04/outlining-your-house-in-rgb-lights.html
Power reduction link>> https://www.doityourselfchristmas.com/wiki/index.php?title=Choosing_a_Pixel_Voltage:_5V_vs_12V
https://www.youtube.com/watch?v=7ZB83Bwh3wA
Modular pixels I bought from (Ray Wu):
https://www.aliexpress.com/item/LED-digital-module-WS2811IC-5050-3LEDS-DC12V-input-waterproof-20pcs-a-string-256-gray-scale/564861370.html?spm=a2g0s.13010108.99999999.8.J2H9bx
Thank you so much for your detailed post. I’ve been researching this for a while and haven’t found anything nearly as easy to follow. Keep it up!!
Loved your site. Thx for posting this. I have a quick question for you. I have a falcon f16v3 and 2 expansion boards. I’m planning on powering these w six power supplies. I know this is a stupid question. On the power supplies. Which ports do I connect the red and black Thhn wires? I new to this hobby and could use some help. I have asked a lot of people on different forums and could not get help. Can you help answer this question. I’m a visual person and tried looking at your images as a reference but the quality was too low to zoom in.
Why do you need the Raspberry Pi? The specs I’ve seen on the F16v3 seem to suggest it can be run standalone. Granted I’m completely new to this, just starting to research and maybe do a small project next year.
Why do you need the Raspberry Pi? From what I’ve read it seems like the F16v3 can be run as a standalone player. Granted I don’t completely understand what that means as I’ve just started reading into this and feel like I’ve taken in more info than my brain can hold.
Great tutorial! I am using this to start my first pixel display very similar to what you did. I am just digging into the art of setting up Xlights, PI and Falcon controller now. 🙂
Just curious if the finger next to the Raspberry Pi has a purpose? lol
no lie, this is excellent work. thank you for sharing!
Thank you was just about to give up on the whole idea of running a computerised display as was having trouble finding information.
I would LOVE to see a power injection article. I feel this is most missed online from what I’ve seen.
I’m just starting into the hobby after creating 2 LED clouds last month.
The way you describe these really helps me out.
Could you please make one for us within the next month?? Haha
so sorry for not responding to this earlier. My last few months have been interesting.
Anyways, i’ll look into doing a few more post soon. Especially since the 2020 season is coming to an end.
Cheers,
Brian
Hey Brian, enjoyed reading your story on pixel lighting. I’m thinking of embarking down the same road. Was curious if you were happy with your selection of the F16V3 given where you are at now. Thought it too would make for a good selection for the first controller while allowing for some future expansion.
Sorry for the late response. I now own two F16V3 boards and love them.
Cheers,
Brian
Nice article Brian, I especially likes your image of the house with lights depicted as colored lines which is just like we do for light show composition with the flickerSong. On the ScottEffx website we show our free software where one takes an image of their scene, the house in your case, then decorates it with lights. For the ScottEffx software, the decoration is done using the online free Gnu Image Manipulation Program (GIMP) which is similar to Photoshop, and each set of ‘lights’ is a different layer which the ScottEffx software on the Macintosh controls just like the real light show. This lets you simulate the decoration and light show design, and even save the music and lightshow to MP3 without spending a penny! When it comes time to set up the lights, the real thing plays with one or many flickerSongs just like the simulation.
Since you are into electronics I will mention that the flickerSong runs standard LED string lights for the music light show using pulse width modulation refreshed at 210 Hz while commutated at 720 Hz using high voltage Mosfets and a Microchip Inc. controller and WiFi module.