
I found a need to highly document an easy approach for users to setup a Raspberry Pi Falcon Player (FPP) with WiFi so that I could access the FPP connected to a Falcon F16v3 over the E1.31 (Ethernet) both from my house PC.
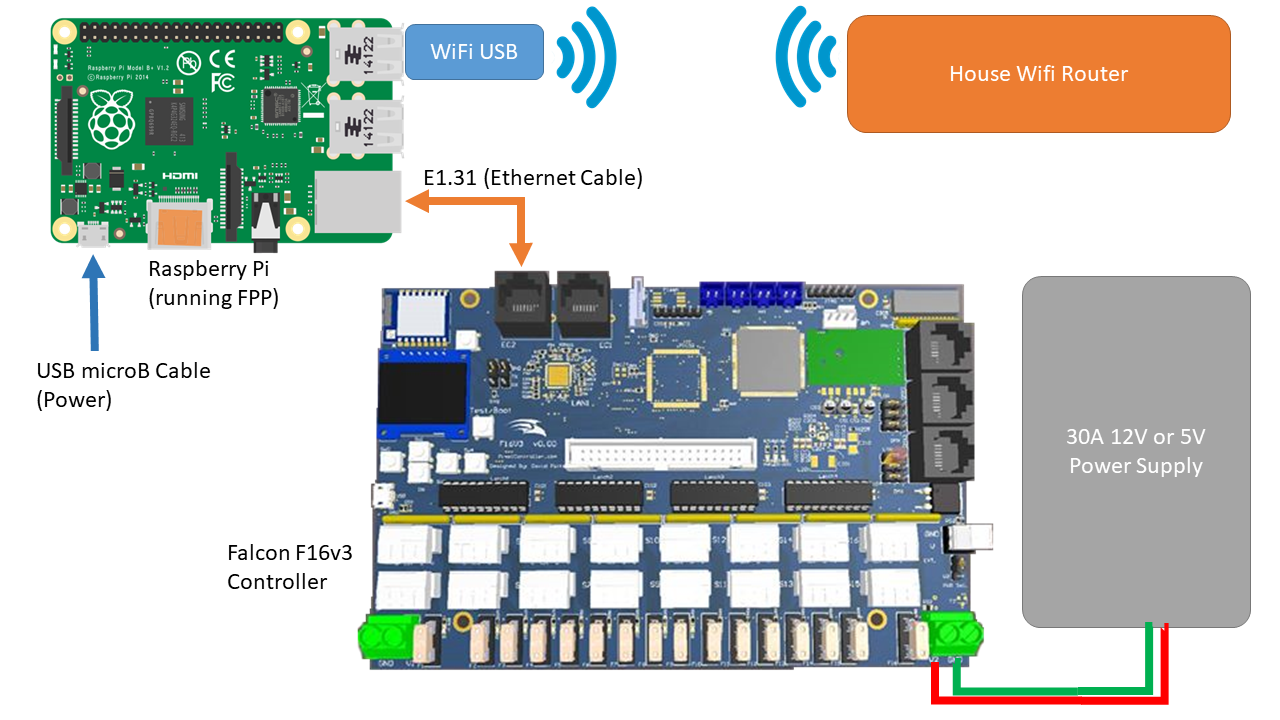
Here’s my layout:
There are 7 steps you need to setup in order to correctly connect from your local computer in your house. This tutorial assumes you already have the Falcon Player on a Pi installed (i’m running v1.8) and v2.00 on the Falcon F16v3 controller.
Other tutorials:
First Step
You need to have everything wired up like I have in the above layout. A WiFi module plugged into a Raspberry Pi (or use a Raspberry Pi 3 with a built in WiFi Chip), I used a Edimax module I had laying around that supports Linux. An Ethernet (CAT5) cable setup between the left Falcon RJ45 input and the Ethernet input of the Raspberry Pi.

Second Step (wlan0)
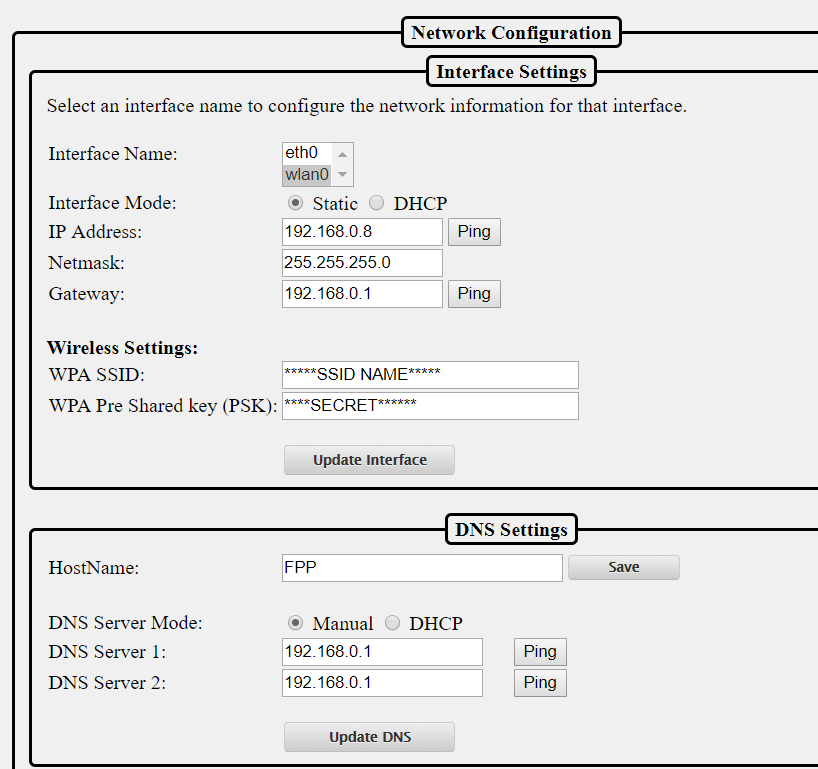
Have the wlan0 (WiFi) of your FFP network setup for DHCP and obtain your local IP address for the Raspberry Pi, mine is 192.168.0.8 which is set by a router, or you can setup a static IP that is of the same subnet class of your router. Make sure your Pi is logged into the router with an SSID and password.
There should also be a DNS of the router, mine is 192.168.0.1 remember this number because you’ll need it for when you setup both the controller and Falcon Player network settings. If using DHCP, no need to manually set it up for wlan0. Below is a picture of my wireless setup. You can ping to make sure you have good connection access.
(Hint: you’ll need to connect via Ethernet initially to setup the WiFi settings)
(Hint 2: if you have multiple Falcon Player’s in your show, be sure to use a different HostNames, as this makes it easier to connect to when setting up and checking your display.)
Third Step (eth0)
Understand the end goal is to setup the Raspberry Pi to pass-through local network data to and from the falcon or equivalent controller. In order to do this you need to setup the local FPP with a separate subnet that still works on your primary house router. An example of this is changing the third octet to something else.
Local house subnet example (house and Rasp Pi): 192.168.0.xxx
Local Pi to Controller example: 192.168.1.yyy
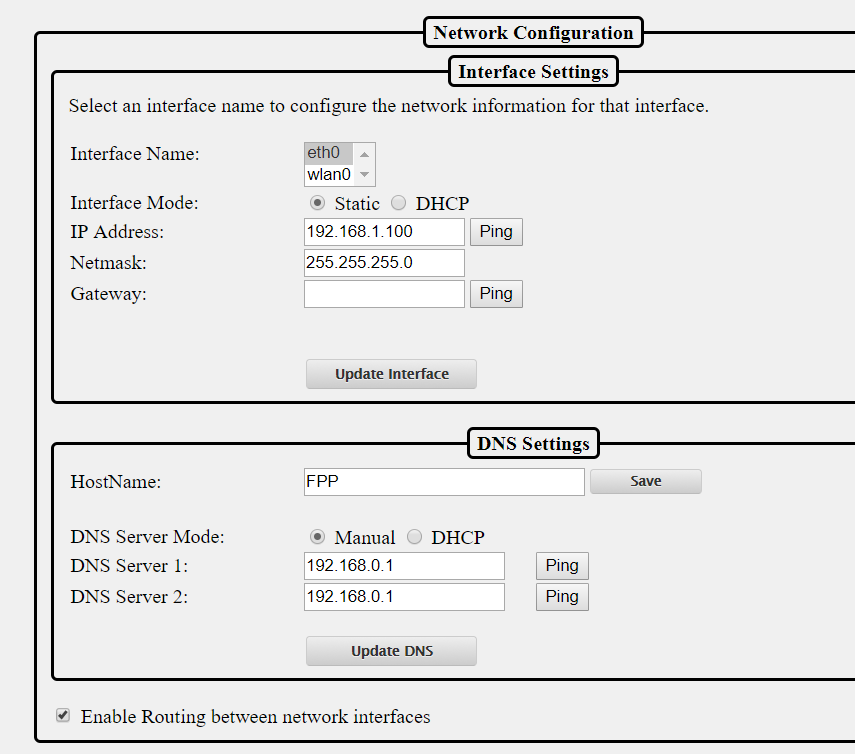
Next you setup a static IP address on the eth0 device of the FPP, in my example I chose 192.168.1.100 which is different from my wlan0 subnet octet with a IP address of 192.168.0.8 as can be seen in my setup pictures. Setup a Netmask of 255.255.255.0 and LEAVE the Gateway blank!! When you’re done press the ‘Update Interface‘.
Next setup the DNS to the same settings as the wlan0 which in my case is 192.168.0.1 for both the primary and secondary. Then press the Update DNS and Restart the DNS buttons. You might need to reboot the Raspberry Pi for good measure.
Fourth Step (Routing)
This is a simple step, because we need those from time to time. Make sure you check the box at the bottom of the Networking page of the Falcon Player so that you “Enable Routing between network interfaces”. This is very important if you want the Falcon controller to have internet access or to be reached from your house PC.
Fifth Step (Enable E1.31)
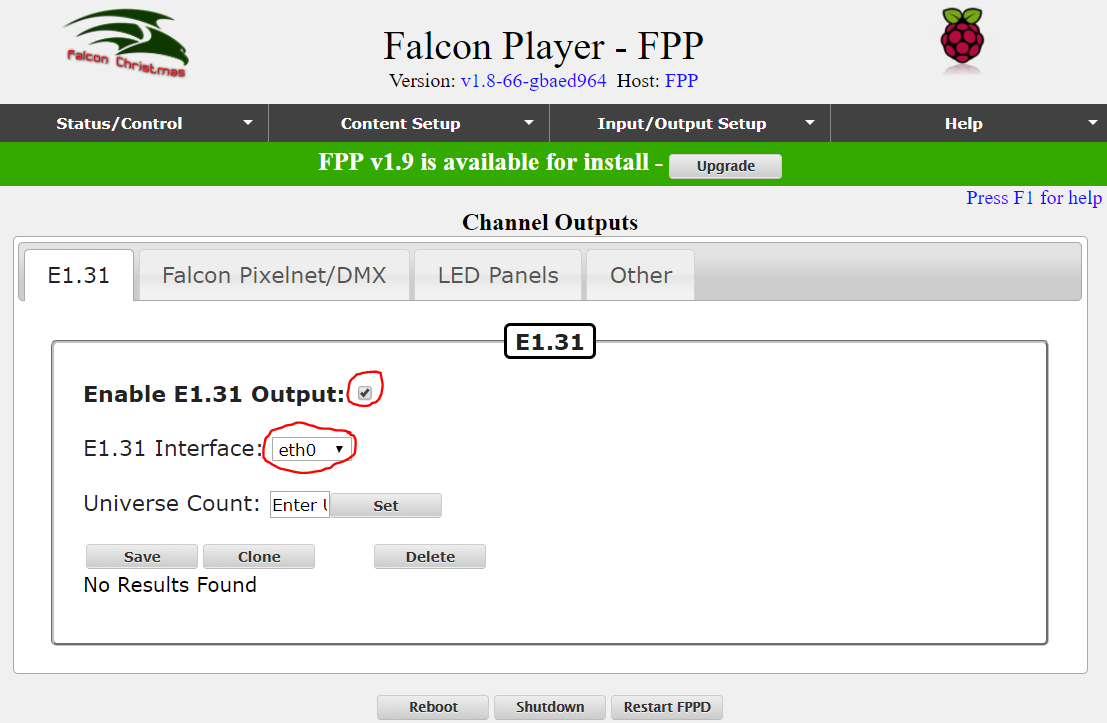
This is another easy step to miss, was my primary reason I dug around the internet so long. The communication won’t work between the boards if you don’t enable the channel outputs to talk via eth0 and enable it. Go to the Input/Output Setup tab and select Channel Outputs. See the picture below for what to enable and select. (Don’t worry that I don’t have Universes setup yet).
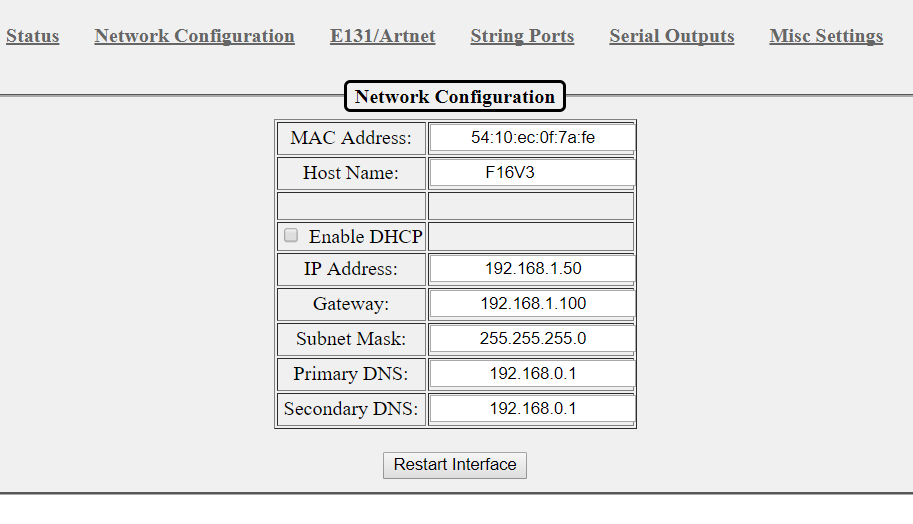
Sixth Step (Falcon F16v3)
Lets move to the Falcon F16v3 controller or whatever controller you’re using. This is the smart pixel RGB controller that provides power to your LEDs and tells them what color and intensity to be in your sequence. We’re going to setup the network so its working with the Falcon Player.
First thing to do is make it a static IP, then make sure its apart of our eth0 subnet mask, but not the same IP address. So for my controller IP address i’ll pick 192.168.1.50 so it doesn’t match the eth0 IP address of 192.168.1.100. Then setup the subnet mask as 255.255.255.0 which should be default for most.
A very important item to setup correctly is the Gateway address of the controller. To make this whole thing work right you need to set the gateway address to the same address as the primary FPP eth0 IP address. Which in my case is 192.168.1.100, don’t be alarmed or confused, just make sure they match.
Make the DNS primary and secondary the same as the house router, so in my case 192.168.0.1 will do just fine. Press the ‘Restart Interface’ button when finished.
Seventh Step (PC Routing)
Almost done, you’re on your way to accessing both the Falcon Player and Falcon Controller remotely. Way to go!
In this last step we need to tell your local PC that you have another subnet mask actually located behind the Raspberry Pi, because your router isn’t that smart to know whats behind it. So to do this we setup a PC IP route to point your PC to the Raspberry Pi which in tern accepts the alternative subnet and directs the data to the Falcon Controller for access. See its Simple!
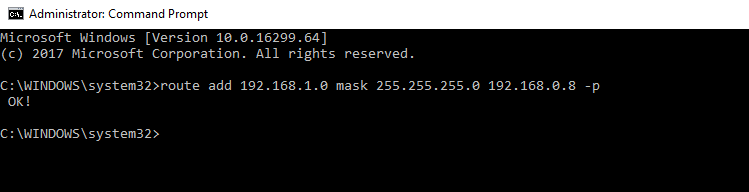
First, open up the MS command prompt (CMD) as administrator. Right click it in the search, select Run as admin.
Then type into the prompt the following, with your Falcon Controller IP address, the subnet mask and the wlan0 IP address of the controller. The -p means this is going to be a permanent assignment. you can replace ‘add’ with ‘delete’ if you make a mistake. For my local laptop I setup the following:
>> route add 192.168.1.0 mask 255.255.255.0 192.168.0.8 -p
And that’s it!! now open a browser and type in your IP address of the Falcon Player and the IP address of the Falcon Controller to start setting up your devices.
Hope this was helpful.
This tutorial should relate to all Falcon Controllers like the F16v3, F4v3, F16v2, F16v2r, F4v2
Resources used in the making of this post
Video Tutorial >> https://vimeo.com/182800368
Falcon Player Manual (networking section) >> https://falcon-player.gitbooks.io/falcon-player-manual/content/chapter_seven_status__control/network.html
Falcon Forum >> http://falconchristmas.com/forum/index.php/board,62.0.html
I tried his solution and was not able to connect to the controller after adding routing to the computer.
Trying to ping the controller IP. I get “TLL expired in transit”. This means the router is misconfigured which caused the packages going on private IP address were leaked to the internet. You can do tracert command or look at router log to see it never returned.
To fix this you must
1) add Static Routing to point destination IP (controller IP) to the wlan0 IP (Raspberry Pi WiFi IP)
or
2) setup forwarding or NAT policy to direct all incomming requests of Controller IP to the Raspberry Pi.
Yes you’re correct, if the router isn’t handling the route correctly and adding the PC side route isn’t good enough, and if your router can handle static routing (mine couldn’t), not to be confused with port forwarding. Then yes you can setup another alternative to communicate within your house network.
Seems really strange that if your controller IP is still a subnet of the wlan that pointing to the raspberry pi to handle the IP wouldn’t help. Are you sure you had the Falcon controller setup to route the information to the controller in the ‘Fourth step’?
Did your options 1 or 2 work?
hello
I write from Italy and my name is Marzio
I want to realize the light show for Christmas 2018.
I’m in possession of raspberry pi v3, I followed all the directions imaginable but I can not connect him to wi-fi
can you help me?
thank you
Hello Marzio,
Welcome. Do you also have a Falcon Controller? an Ethernet cable between them?
Double check you have the IP addresses and all subnets correct. And every small item in the steps I listed.
Cheers,
Brian
I was about to loss my mind trying to setup Falcon Player FPP with F16v2 thru wifi. Then I found your web post and had it up and running in 10 min. Thanks so much for the post. Excellent job.
Any ideas on setup of the Falcon Picap as remote to the FPP with F16v2 wireless? Thanks in advance for any help.
Perfect! Glad I could help you. I think one of the Falcon Controller setting tabs is made for serial DMX devices. Once setup, i’d assume the channel ports menu would adjust? Haven’t tried a Picap, so I don’t have a good answer for you. Sorry.
Cheers,
Brian
Thanks so much for this!!! I had to add a static route in my router settings, but your writeup was excellent and saved me a ton of time.
Hello Dustin,
Glad it helped you!! Hope your Christmas light show rocks this year.
Cheers,
Brian
Thank you so much for your tutorial. It helps!
About Step 7.
This “route add 192.168.1.50 mask 255.255.255.0 192.168.0.8 -p” doesn’t work for me
This “route add 192.168.1.0 mask 255.255.255.0 192.168.0.8 -p” works
Thank you Alex!
I later realize I had both in my route on my laptop, but when I tried my desktop only the 192.168.1.0 made it work. Good catch and thank you!
Cheers,
Brian
Great write up thanks ….
Makes things a lot clearer!
Only thing – is the command line the same if done in terminal on a Mac laptop?
Brian,
Because of your interest in the Rasberry Pi, I was wondering why those who use the Pi for their Christmas lights don’t just run their pixels straight from a dedicated PC, using the PC’s Ethernet port, and through the Falcon (or, in my case AlphaPix and SanDeivce) light controllers to control the smart pixels? I’ve been a little confuse why hobbyists would go through the mechanics of the Pi (besides it just being so much fun to do so). I have port in my home office (where my dedicated show PC is), which I connect to, which runs to a port in a front eave of my house. There, I have a network switch, from where I run a Cat 5 cable to each of my light controllers. Easy peasy. Adding new or modified sequences to my show is so simple, and there is no messing with the Pi.
Ed
Hi Ed,
Great questions. My main thing is cost and convenience. Having a Raspberry Pi only costs ~$37, I can have it close to my display and the latest version 3 B model has WiFi built into it. So my Falcon Player (SW) is on my localhost network and I can remote into it via a webpage on my network. Meaning I can sit at my PC and load new sequences to it, schedule it to come on without my PC needing to be turned on. Its all on the same timer in my garage. Personally its way more convenient.
Cheers,
Brian
Saved my life!!!!!!!!!!!!!!!!!!!!!!!!!!! Thank you…. I was so frustrated with the routing of the Falcon board from my PC.
THANK YOU!!!
You’re welcome!! Glad I could help.
Cheers,
Brian
Thanks for this info. I must be miiing something. I was all set up with this wireless as a 2 months ago David helped me set up. Eveything was working good until last week lights did not come on. It turned out my micro sd card was corrupt. I reformated eveything and can log into the fpp wired only. I don’t know what I have wrong. Please can you help me?
Wouldn’t the cable between the Pi and the Controller need to be a crossover cable if you’re not using a switch/router?
These days 100Base-T or 1000Bast-T don’t require crossover cables, they’ve solved this with newer Ethernet protocols that don’t require cross over anymore. Even when I do peer-to-peer connection at work with oscilloscopes I use standard cabling.
Cheers,
Brian
How do we do the seventh step in linux?
Great tutorial & thanks. It finally makes sense! Do you have any suggestions on how to add a route on a Mac? The only examples I see out there pertain to windows. Thanks again!
Any way you could clarify step 7 for me? keeping in mind that my ip address’ differ from yours.
Could you use names?
Like FPP wlan0 ip address and F16V3 ip address ethernet connection would be helpful
Very confused I am getting bad argument and parameter incorrect.
Thank you
So I’m beating my head trying to find a forum or down load of the proper fpp software for a pi. I’m new to this and just trying to figure out the first steps.
Hey Brian. New to all this. Thanks for the write up. Can you tell me if there is still a need to have wifi or Ethernet connection once the pi has the sequences build?
Hi Brian, I was trying really hard with the Falcon Pi on my Raspberry Pi 3 B+. I follow all steps but I still cannot connect WiFi to the Pi.
Brian,
I’m Still struggling on this.. for months.. hahaha.. I just cant seem to wrap my head around it ?
You mention to connect everything like you have, but then in the hint, we need to connect to the router via ethernet ?
When do I swap back ?
Cheers
This is great! However, I have a question.
I am trying to set this up using the raspbian desktop.
When i go the command prompt to add the IP route, the command is different.
Im guessing I need to write that same IP route command in linux language
Not sure what that would be, been trying to find out but no avail.
Would you know?
This is a great tutorial with my Pi 3+ and my F16V3 is now set for WIFI, now I will connect and configure my Beagle-bone Black to my F16v3 to so that the F16V3 can communicate to the Beagle-bone Black. Once again you out did self as instructor. Thank you very much and may GOD be with you.
Brian,
I have a different router IP address of 10.0.0.1 and using a Mac. I’ve have tried to emulate you directions by substituting your 192.168.x.xxx with my 10.0.x.xxx
For which I can communicate with the pi and nothing else. The last step (7) is regarding using CMD for windows and I use Mac in terminal. Do you know what the command for Mac would be?
Thank you for any help!
Did you ever figure it out with the 10.0.0.1 ip address?
Found this on another forum for the Mac terminal command:
Mac: sudo route add 192.168.1.0/24 192.168.0.xxx (xxx is pi wlan0)
forum thread here: https://falconchristmas.com/forum/index.php?topic=8797.0
Like a couple of others above…regarding STEP 7 and wondering what to type in using TERMINAL on a Mac please
Hi, thanks for the help. I did everything and wouldn’t work. Was going crazy and then powered down the Falcon, and when i powered back up, it worked, thanks again,
Hi Brian. I just wanted to drop you a line and let you know that your tutorial written has helped me a great deal. I think we often present problems to others and never acknowledge what goes right. You Rock. Thank you so much for doing this. Best Regards.
Brian, You saved me with my new F16v3.. Only I can test from the F16 test page, yet I cannot get them to work from the pi falcon page testing. If I try to do outputs on E131 it says I can’t save them. I’m running v3.5.6
Just a couple of questions. I am interested in doing this from a Mac. Is there any help on step 7 for that? Also, does the PC/Mac have to be connected through ethernet as well or can it be done on wifi?
I’m sure a MAC can reroute an IP address. But since I don’t own a MAC I wouldn’t feel comfortable guessing.
Connection wise, I believe it can be done via Ethernet or Wifi, the controllers are supposed to have a firmware update that enables you to do more remote control without a Raspberry Pi board wifi but I don’t think it will allow you to load sequences and such, just control. You can always have a local PC connected, all that PC has to have is Xlights scheduler running. Or do like most and buy a $35 Raspberry Pi and download/install Falcon Pi Player (PFF).
Cheers,
Brian
Could not get this to connect until I realized the the SSID in the second step is case sensitive. Changed the case and everything worked.
Hello Brian I used your instructions the first time and the setup was successful, thankyou. I have a PI 4 connected to a switch, f48 connected to the same switch, my computer and router also connected. However something happen and now I have a network issue. I have tried several things including trying new switch and new pi board. If I run the test mode from the f48 the lights work. I can connect to the fpp and the falcon f48 with no problems. If I use the falcon player on the rasberry they do not work. Also the amber light is lit in my pi and my f48 like they are not communicating. I also tried static and DHCP both working the same. Also xlights lights will not output the lights when running a sequence. Everything worked before now not sure what is going on. Also reformatted sd card and move new image of fpp on the card. Rebooted router, f48 and pi several times. If you have any suggestions I would appreciate them. Thank you for you time.
Thank you so much to share these steps, it helped me a lot to setup my environment. And saved me a lot of effort, avoiding to install ethernet cables through the house.
Genius! I was having a heck of a time with this on my mac between my rpi and Falcon F48 v4. You provided direction to get me there.
I followed your directions to the T, but this is the command I used to add the static route to my mac.
sudo route -n add /24
Much appreciated!
Hello, I am new here I just want to ask if I can connect alphapix 16 controller to falcon pi player.
can still that work? i cant see a tutorial about falcon player to alphapix 16 controller setup.
i hope you notice me 🙂
thank you
I followed your setup instructions and can access it no problem from my laptop, but I cant access it on my android phone (same wifi) I can get to the FPP but not through the subnet to the controller
Brian, have you updated these instructions, which worked great for FPP R5 btw, for FPP R6? I can’t get to the Falcon Controller despite following these directions.
Thanks
Henry
Going to make a new post… there’s defiantly need for it.
Even in 2023, this is a great write-up. The only thing that caught me up was that the FPP software hid the IP routing checkbox behind the advanced settings GUI. Just a note for anyone else using this as a guide. Great write up!
I also added the route to my router rather than any PC so that it works anywhere on my LAN. Just another option for folks.
I’ve just installed a Raspberry Pi4 and upgraded to FPP7.1, replacing a Pi3 and I’m struggling with the routing – there doesn’t appear to be a ” enable Routing between network interfaces” option on a Pi4 with FPP7.1. Any ideas where this is?
I’m adding a Raspberry Pi as the controller to my show this year. Is this article the most up to date? I’m using a Falcon F16v4.