
 So this is going to be a many part series for a robot project i’m working on. This first one covers writing a program that runs on the Raspberry Pi. This program is going to connect through bluetooth to a Nintendo Wii controller and allow you to control the data via Python. Cool I know!
So what I did first was familiarize myself with connecting my Wii controller to my PC (virtual desktop running Ubuntu) and using Cwiid as a module I was able to write a small program to grab the data. Once I knew I could connect and communicate all I needed to do was port this over to my Raspberry Pi.
Parts list:
- Raspberry Pi
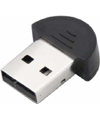
- bluetooth USB dongle – I bought this one SABRENT at Frys Electronics for $10
- Wii Remote – Black
- Standard Raspberry Pi cables (power, keyboard, monitor)
Make sure you first have debian installed and up to date on your Raspberry Pi. I did a ‘how to’ earlier that can be found HERE, the only difference is I installed the BETA ‘Wheezy’ version. Once you have your board up and working make sure you update everything.
sudo apt-get update
sudo apt-get upgrade
This could take hours depending…
Installing the Bluetooth Dongle and drivers
The first thing is to plug your Bluetooth dongle into one of the USB ports of the Pi.
Once you have your Raspberry Pi booted up install the bluetooth package for it. Mine tool about an hour to download. To reduce this time install it without the GUI started.
sudo apt-get install bluetooth
Once it is installed, make sure you can see the bluetooth device and scan for your Wii Remote.
sudo service bluetooth status
If it isn’t connected type this to start up your bluetooth, or reboot your Pi:
/etc/init.d/bluetooth start
To get your bluetooth address type,
hcitool dev
This will show your dongle address. Something like this:

Next you can scan for devices. Type the following in, then press the 1+2 on your Wii remote to make it searchable. By pressing the one and two this will put the controller into discovery mode.
hcitool scan
You should see something like this, representing your Wiimote address and name.

Installing CWiiD for Python
Next we need to download CWiiD, this is a great python module that allows us to control a Wii remote in Python, it has been ported to the ARM, x86, and AMD. To download and install type:
sudo apt-get install python-cwiid
Now that it has been installed lets try it out. I’ve created this program that controls the Wii remote in Python. All you have to do is download it to your main directory.
wget https://sites.google.com/site/brianhensleyfiles/wiimotetest.py
Then to use it type,
sudo python wiimotetest.py
It will ask you to press 1+2 on your Wiimote, once you do so it should say “Wii Remote connected…”:

I have this setup for part of my robot project so I have a center point AKA ‘position 50’ and it has limits of 0 to 100. So as you hold your wii remote horizontal you can press left and right and it will increment +/- 10 from 0 to 100. The other features are pressing the button number 1 and 2 individually. This will be displayed by saying those buttons were pressed. The last option is pressing some of the buttons together and having a message say it is moving forward or backwards and with what position.
I set the MINUS button to turn on and off the Wiiremote rumbling feature.
To disconnect and close the connection I setup the PLUS button on the wii remote to disconnect from the Wiimote.
Understanding CWIID / TIPS:
In python it’s important to know more about writing your code to take data from the CWIID module and controller. The first three things I recommend doing are including the module, enabling buttons, and try out the State options.
import cwiid
wm = cwiid.Wiimote()
Next be sure to enable button data reporting,
wm.rpt_mode = cwiid.RPT_BTN
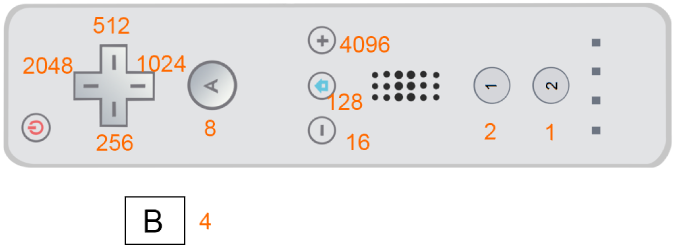
What you can do next is determine what the value of each button is (see picture below). NOTE: when you press mutliple buttons the number values are added together. For example, when you hold the remote horizontally and press the left button it returns a value of 2048, when you press the right button you get 1024.
wm.state[‘buttons’]
If you click button #1 you get a state value of 2, so for example you could press the right button and the button #1 and get a state value of 1024 + 2 = 1026, because they were added. In my python script you can see I did comparison statements of the total status value for multiple buttons. Here is an image I drew up with the button values, labeled in orange. Use this to reference your Python program for what buttons you are pushing.
NOTE: it may be useful to add some delays in, so you have time to return the remote value and have it do something in your program.
Thanks for reading! Please be sure to comment your experience and follow me on twitter to keep up on my next blog posts! twitter.com/bhensley
Bibliography:
http://packages.debian.org/wheezy/bluetooth
http://wiki.debian.org/BluetoothUser
awesome inside wiiremote details:
http://wiibrew.org/wiki/Main_Page
Good Wiimote python example:
http://talk.maemo.org/showthread.php?t=60178
Thanks for sharing. You're right. It _is_ awesome!
My pi is able to see my wiimote, however after downloading your code and running, sudo python wiimotetest.py, I get a invalid syntax error, please help. thanks.
my mistake, I tried doing the wget {dropbox link} and found it grabbed all the html code too…weird! I didn't think dropbox would screw up my download. Try going to
wget https://sites.google.com/site/brianhensleyfiles/wiimotetest.py
I've fixed the link by putting my files elsewhere. if you still have problems try removing your USB bluetooth and plugging it back in. i've had to do that a couple times too.
Nice work! Coincidentally I've just found myself going in completely the opposite direction. You're wireless with the Wiimote and I'm hard-wired with the Nunchuk — http://www.pimyride.co.uk/2012/08/12/wii-nunchuk-raspberry-pi-chukberry/
I notice you've worked with the SPI Interface, I've bookmarked the for when I come to interface with a real-time-clock for when the Pi is away from an internet connection. Great resource, keep up the good work.
Thanks for this…very nice article.
I got my bluetooth dongle a little cheaper at dealextreme.
http://dx.com/p/super-mini-bluetooth-2-0-adapter-dongle-vista-compatible-11866?item=13
Thanks for the cool article.
This is exactly what I've been searching for. Thanks!
Awesome! It works fine. Somebody knows how can I use it to play roms in the raspberry?
Thanks!
Wow. It worked. Great instructions. I've been using a nunchuck and arduino to control my model train, but I'd like to use the Wiimote and pi to run it using python. I think you just sold me on the idea. Thanks!
Thank you for sharing, very nice tutorial.
Um, The button named 516 in the illustration should possibly be 512. These are binary values as illustrated in the extensive wiiremote documentation on the detailed wiibrew site.
You are correct. Thank you. I'll fix that soon.
Nice article, really helped me get on my feet with this, just needed the "hello world" to get rolling.
A couple things to note, your image for the right pad button is labeled as 516, when it is actually 512.
I see no reason why you need to execute the python script with sudo, it runs fine as a user (for me at least).
Lastly, instead of invoking your bluetooth commands via /etc/init.d/bluetooth, it is recommended that you use the 'service' method… Like so: sudo service bluetooth status
Thanks again.
Thanks Andrew, I've made the correction to the picture to display 512. Ya looking back I wouldn't need to run it as sudo, rookie mistake. Glad you got it working. Enjoy!
Cheers,
Brian
this is really helpful. also do you have any experience with setting up the ps3 controller with raspberry pi or linux with python? thanks.
As there has been no follow up, was it not possible to go further with the controller? Looked really good too! I was thinking that if the controller was mounted on a robot it could provide feedback data on position etc? Great article tho!
Hi Terra,
I actually got a lot further, but was not able to write it up yet. Been busy the last couple months, as my dad has passed. But for my job I was able to use this to show off one of our new oscilloscopes. Check out the video, and expect a article on an update in the next month.
http://www.youtube.com/watch?v=pl4GxuIw-sA
Cheers,
Brian
Dunno if it wasn't available back when this blogpost was posted, but cwiid provides constants for all states (cwiid.BTN_1, cwiid.BTN_2, etc).
How do you map the wii button events to keyboard keys?
Is it possible to use the wiimote as a mouse?
Up to a point, your example works great. Until everything is synched and I get the "Press the PLUS button to disconnect the Wii and end the application" message. After that, I get no response at all. Just the 4 lights blinking repeatedly whenever I press a button. Is it a bad wiimote, or something else?
For debugging I would make sure the wii remote is connecting by setting one of the lights to show once it's connected. To do this you can send this command: wm.led = 1
Try using the red sync button instead of the 1+2 button for connecting. Also try unplugging the USB bluetooth and reconnecting it.
In my latest blog, the robot one, i go into detail about doing error checking for if the remote has connected. I don't know if this will help disconnect… but just play around with the python 😉
http://www.brianhensley.net/2013/03/raspberry-pi-robot-wii-remote-phase-1.html
Brian
Any Bluetooth dongle should work, right?
Thanks
Not sure if any/all would work. I looked for one that was Linux compatible. or you could check the 'Working Bluetooth Adapters' list from a compatible list: http://elinux.org/RPi_VerifiedPeripherals
Cheers,
Brian
hi!, I i'm new to linux and I having trouble with every guide that make use of cwiid. when I excecute your wiimotetest.py I get this message https://dl.dropboxusercontent.com/u/46420562/Imagenes/wiimote.png
I make everything you post on your blog.
thanks in advance for your help!
Thanks a lot for this great tutorial. It worked fine for me with the ASUS BT-211 dongle.
Hello!
So far I've not even gotten my WiiMote to be seen by the Bluetooth dongle. It's a Targus one ostensibly aimed for their laptop mice. It works properly on my Linux setup who's running Slackware 13.37. For that I built and installed the Python based stuff that the Raspberry Pi also uses, on it. When I run the tool for scanning to find the controller, it promptly works for a bit and then complains that it times out. However the same instructions work on the box and even your Python script works. Oddly enough I had the same problems with the R.Pi and the same dongle and even the controller.
I notice that I was using a black wiimote, so I decided to try a white one and it worked perfectly
But who makes your Bluetooth dongle? The branding on mine is that of Targus, but the internal chips is that of the same company who makes the processor on the Pi.
Broken mirror on python-cwiid .. although, great tutorial.
Is there any way to use the tilt, speaker,and nunchuk? Also epic project me and my dad are planing to do the same with a rotatable camera and other cool things. he's helping me because im new and only 14.
The wiimotetest.py if statements have some of the wrong wm.state['buttons'] values. I edited my local file to use the values in the picture. It now does things for all buttons, thanks for the tutorial.
Effectively teaching elementary math to children aged 5 to 10 (Grade 1,Grade 2,Grade 3,Grade 4,Grade 5).Great for Homeschool kids! All math results are logged and graded and we show how they are improving through real-time feedback.click hereForm 1,Form 2,Form 3
The nunchunk plugs into the wiimote, so can we read the nunchuck values over bluetooth somehow?
Do you happen to have a file that has all of the possible commands to interact with the Wii remote? Or can you somehow read the library that you need to download? A bit new, so help would be nice.
-Thanks!
I want to do in Windows + Python2 debugging, but is able to run on the Windows cwiid, you can?
import cwiid. Then type dir(cwiid) to get all the possible commands.
It should be as it is included in the cwiid module
Hello Brian. I saw the Video and bought 3 different USB-Bluetoth Dongles. I updated my PI (Raspbian installed) and then followd your Manual.
from the command hcitool scan i get the answer: 2C:10:C1:C8:4E:A5 Nintendo RVL-CNT-01-TR
But your python-script answers always:
Press button 1 + 2 on your Wii Remote…
No wiimotes found
Traceback (most recent call last):
File "wiimotetest.py", line 99, in
main()
File "wiimotetest.py", line 21, in main
wm=cwiid.Wiimote()
RuntimeError: Error opening wiimote Connection
I tried all the 3 Sticks and always rebootet the PI. I get every time the same error.
Do you have an idea for me?
Marco, Germany
The little mediallions are sheets of metal squares that I cut up. We spared a fortune by doing this as opposed to purchasing instant emblems.
Perhaps there is by any means to work with this tilt, phone speaker, along with nunchuk? In addition epic challenge myself along with my dad are generally planing to perform a similar using a rotatable photographic camera and also other cool items. he or she is supporting myself simply because im brand new in support of 14.
Perhaps there is by any means to utilize this tilt, audio, along with nunchuk? Additionally impressive undertaking everyone along with dad usually are planing to try and do exactly the same with a rotatable photographic camera and also other neat things. he is encouraging everyone mainly because i will be completely new in support of 18.
Hi!
Thus far We have not just received my WiiMote being noticed from the Wireless bluetooth dongle. It's a Targus one evidently geared with regards to laptop these rodents. This performs properly on my Linux startup who has managing Slackware 13. 37. For that My spouse and i built as well as put in the actual Python structured stuff that the actual Raspberry Pi in addition utilizes, into it. After i function the actual device intended for encoding to find the controller, the item instantly performs for a tad and then complains that it periods available. However the exact same guidance develop the actual container as well as your current Python script performs. Strangely enough I did a similar difficulties with the actual Third. Pi as well as the exact same dongle as well as the actual controller.
Did you find a solution for this error?
YES!!!!! Thanks for this!
Long story short, we're opening a gaming cafe, planning on having some VR stuff going on, and now thanks to you I can integrate my wiimote directly into Blender with python and make some exclusive VR games and interactive experiences.
Thanks for sharing those instructions. Running on Pi Zero very easily. Now for some Python!
TY MAN YOU ARE THE BEST!!!!! Supert cool TUTORIAL
I have got some new information here. I will book mark it.
Bluetooth balance board
I agree read more
Sorry for the question, but it there any way you might be able to post an image of your card? That way I can just flash it back to a Micro SD (opposed to downloading all of the individual packages). If you can, that we be awesome. Again, sorry for the request, but if you can, it would be very much appreciated.
Thanks a lot for this great tutorial. It worked fine for me with obd2 adapter