So my last post on how to use the Nintendo Wii controller with the Raspberry Pi was popular. Thus, i’ve been working on the next stage of the project which includes connecting my Digilent Cerebot II Atmega64L micro-controller to the Raspberry Pi. This required that I get the SPI connection working between the Pi and the micro-controller and get the Wii remote to control everything. I constructed this raspberry pi robot using a set of Python and C programming with modules I either created or borrowed.
Check out Previous Posts to help build the robot!
- Getting Wii Controller working with Raspberry Pi
- Getting Serial Peripheral Interface (SPI) working on the Raspberry Pi
- Python over SPI channel
- Installing Debian (linux) on the Pi
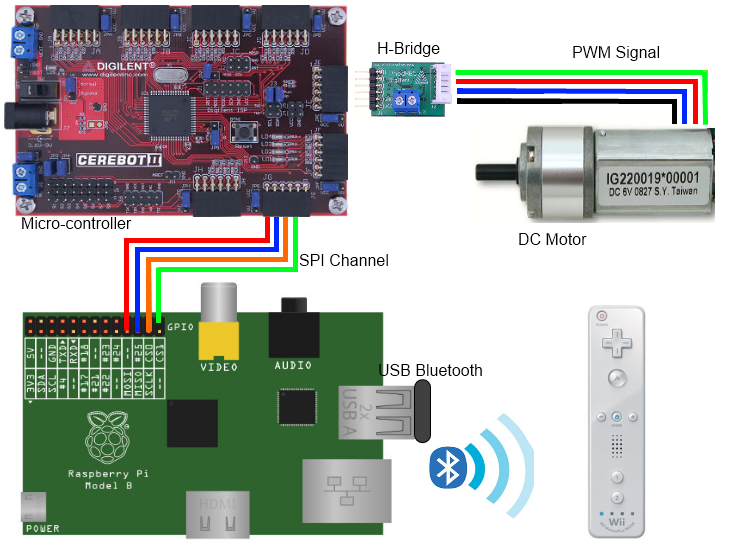
My current hardware setup looks like this:
- Raspberry Pi
- Digilent Cerebot II (Atmega64 Microcontroller)
- 2x H-bridges (Digilent)
- 2x 6 Volt DC Motors (PWM controlled)
- USB to Bluetooth – this one SABRENT at Fry’s is what I used
- Nintendo Wii Controller
- 8x 2AA batteries (6V for the Micro, 6V for the Pi)
This picture describes the basic setup of my remote control robot.

Getting Started (Python + Bluetooth):
So in this post i’m going to go over the different parts that build up my robot project. The first one is the Raspberry Pi and Bluetooth module. As I’ve used in my previous Wii Controller + Python + Raspberry Pi = Amazing! blog I used the Cwiid python module that enables my to connect to a USB Bluetooth dongle I put in my Raspberry Pi. You’ll need to install Cwiid for python on the Pi.
sudo apt-get install python-cwiid
Once this is done you’ll have to start your program with some python code that connects to the controller. So in your Python code make sure you include the library and then cwiid.Wiimote() connects to the Nintendo Wii remote.
import cwiid
wm = cwiid.Wiimote()
After this you’ll want to enable button data reporting.
wm.rpt_mode = cwiid.RPT_BTN
All the buttons on the wii remote have values that can be queried. The best part is they add, so if you’re pressing multiple buttons such as left + gas, which are values of 2048 + 1 = 2049. Something like this
wm.state[‘buttons’] == 2049

Getting Started (Python + SPI):
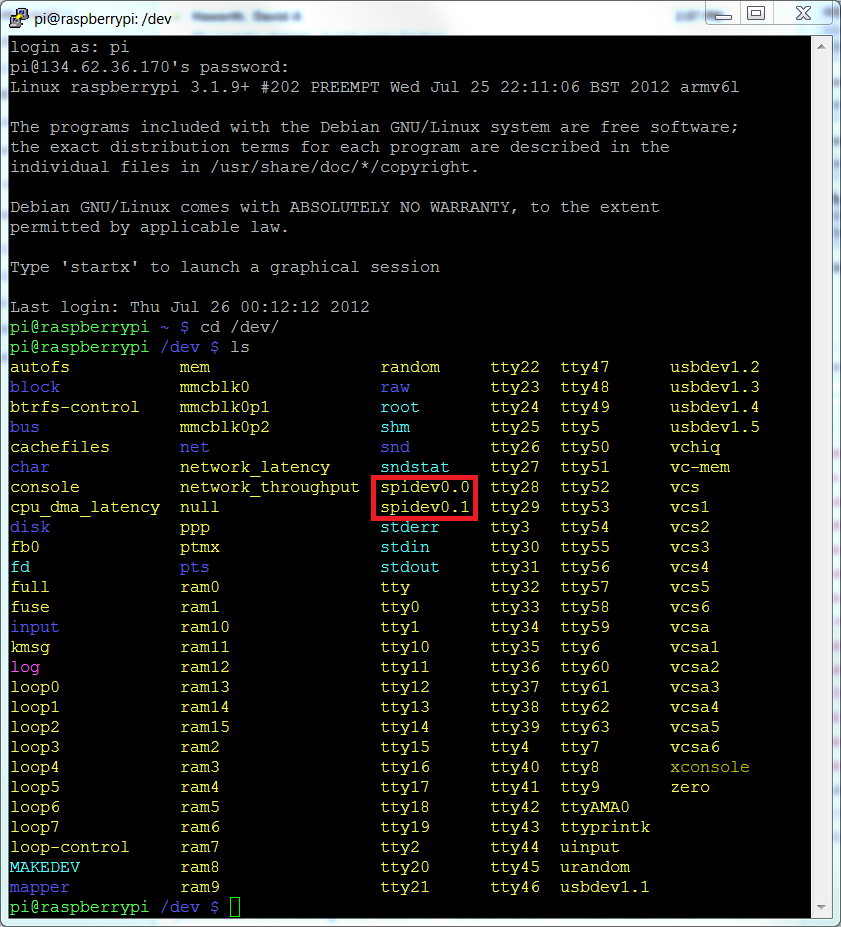
The next phase of this project was getting the Serial Peripheral interface (SPI) working with the hardware. As with many parts of my blog this one can take a lot longer as I had to write code in C and make a module that can be called in Python. Please check out my previous post on Python Controlling SPI Bus on the Raspberry Pi and Beagleboard XM for getting Python working. You have to make sure you have SPI enabled in the hardware and from there you can check it by going to the /dev directory. I have another blog Getting SPI working on the Raspberry Pi that helps with getting this setup.
Once your hardware is showing up you can use the SPI.so module I created and call it in Python using something similar to this. For the record my SPI command is in this format, no real reason, just an arbitrary one I chose for hex values.
spidata = [‘FFDDLLRR00’]
Where the DD is representing the direction of the robot, LL is the left wheel speed and RR is the right wheel speed.
spilist = []
#combine the string
combine = str(‘FF’)+ direction[0] +str(rws)+str(‘0’)+str(lws)+str(‘0′)+str(’00’)
spilist.append(combine) # append the string of combined direction and wheelspeeds
length_data = len(spilist[0])/2 + 1
spiconnection.transfer(spilist[0], length_data)
time.sleep(.2)
There is a lot more detail here that i’m not going to go into, but all the logic to my code, directions, logic behind what buttons are pushed and such are written in Python and located in file name “robot_version0.x.py” where x is the version number. All my code revisions will be found in the following folder location. Feel free to check back over time for newer versions.
===> My Code versions: version 0.1 at time of post. <===
One of the many important things to know about SPI is how it works. Understanding it has a data line in and out, a clock and a slave select. All data from the master controller goes to all the slaves, but the master just tells which slave to listen. SPI was originally created by Motorola many years ago and is still very popular in computer communication.

Getting Started (SPI + PWM + Atmega64):
So the last part of this project deals with setting up the Digilent Inc board that is a Cerebot II miro-controller. I’m using AVR studio 4.0 and first started by setting up the mico-controller as a SPI slave so it will take in the clock and Slave Select (SS) from the Raspberry Pi.

Once the SPI signal was setup and tested I configured the Pulse Width Modulation (PWM) signals that would talk to the H-Bridges and help higher voltages go to the DC motors. There are registers that control the speed and the direction. So I have the SPI data read in and then it configures what the speed for each wheel is and set the direction. These values change the speed and feed back the data to the Python code saying what was read in, small form of error checking. Check the code folder for “WiiRobotProject” as this is my code for AVR code. Still a work in progress so there are tons of comments and things I was trying. it will look cleaner in my final code release.
There are a bunch of features I would love to still get out of this Cerebot II board, such as the motor feedback, maybe add some SERVOs to control a camera (phase 3)? Time will only tell if i get around to it.
FINAL NOTE (CODE):
Like posted earlier if you would like to check out my code or get some ideas from what I’m doing please check the link below for my source code. Comments. suggestions, and questions are always welcome. Please check out previous tutorials i’ve written to help with the small details.
===> My Code versions: version 0.1 at time of post. <===
Until next time, peace!

- Battery operated
- wireless putty connection for controll
- Wii Nunchuck support for camera/laser
- Servo control – camera/ front wheels
- Hash checking of SPI data
Hi Brian
Thanks for this code, it works really well with my robot project. I have tried to get the script to run at boot, which I have managed but it has a bit of a quirk. The wiimote thinks it has paired, but the script doesn't unless you wait until it gets to at least one failed attempt and then it all works just fine.
Do you have any idea on a fix for this?
Thanks
Paul
Thanks for sharing this. I have been curious about how to do this and ordered my rasp pi last weekend.
Does the Spi connection have to be a certain type of wires?
At the end I noticed a future incorporation of a Nunchuck. Can the Nunchuck's C and Z buttons be used in the same or a similar way to the the remote's buttons using cwiid?
Hi Paul,
I never tired to get it to start on boot. What i ended up doing was adding a wifi usb module and setup a peer to peer network connection using putty so I could access and see whats updating on the robot. Mine works on the first pairing attempt.
Cheers,
Brian
Not really, just make sure they're well isolated so you don't get any EMI problems. Also, the shorter the better, if you continue to have problems try checking to see if the same commands are returning over the MISO path.
I just use a oscilloscope to look at the signal, but understand most probable don't have access to one.
Cheers,
Brian
I'm sure they could be used. I haven't tried them yet. but i'm hoping with more iterations of this robot project that it will eventually have the nun chuck controlling a camera on servos or something like that.
Cheers,
Brian
I tried this and your other wiimote blog and I get a missing cwiidmodule error. I tried all manners of building the cwwid package from various sources on the web with no luck. I had my raspberry pi working last week and I seem to remember using a build and install command. I can't remember what that was or how I got it to work. All I know is I had to start with a fresh wheezy image and reload everything including apt-get install python-cwiid. This installs ok, but the missing cwiidmodule error now appears. Do you have any idea what build/install commands I might have used last time?
This comment has been removed by the author.
This comment has been removed by the author.
This comment has been removed by the author.
This comment has been removed by the author.
Hello, where can I buy DC motors that are PWM controlled? I can't seem to find them anywhere!
Very nice post and this is a great reminder that there is always room for improvement. Thanks for the great examples and inspiration.
Robotics Courses | How to learn robotics